Joking aside, hopefully you have either already ordered and received your seeds or will be picking some up your next trip to the garden center.
Let's just say for the sake of argument, it is time to plant your precious seeds, and you want to get this thing in gear.
How?
I am going to assume you know what you want to plant, peppers, tomatoes, okra, basil, whatever. The next thing you need to figure out is, what do you want to start them in?
This is going to be more of a financial decision. You can go out and get the peat pots, peat pellets and the like. More on these later. Depending on how many plants you are planning on starting, this could get pricey. Let's just say you are cheap like me, read also poor into that. I like to start my seeds in whatever I happen to have available. Luckily, I have a wonderful wife who gets me those mini greenhouse sets when they go on sale. Side note, these can make GREAT Christmas, Birthday, Anniversary gifts....I am just saying. If I do not happen to have anymore of the mini sets, I tend to improvise.
Three inch plastic pots are a perfect size to start seeds. They don't dry out as quickly, they are of a manageable size and still have enough room for the roots to get a strong start.
Clay pots will work, but they tend to dry out too fast.
Milk Containers. Any size will work. Just make sure you punch holes in the bottom to allow for drainage.
Margarine and Cottage cheese containers. Again, make sure there are holes in the bottom for drainage.
You may even remember a science project from school, using egg cartons. Being that these are rather small, you may want to transplant at least once into a little larger pot before planting outdoors, just to get a little larger root system going.
And of course, peat pots.

These can be planted directly into the ground once the seedlings are good and strong. One piece of advice here though, make sure that no part of the pot is sticking out of the ground when you plant it. It acts as a wick and will dry out your seedling very quickly. To encourage roots to spread out into the garden soil, you will also want to carefully cut or tear holes in the bottoms of these pots, because they usually don't break down completely in the soil, and may inhibit root growth.
These are just a few examples, I am sure your imagination can come up with lots more.
Okay, you got what container you want to use, now you need some kind of stuff to put in the container to plant the seed.
The medium used for starting seeds should be loose, well-drained, and of fine texture. You may use commercially prepared mixes or you may mix materials yourself.
Let's start with an easy and clean way.
Compressed peat pellets. When dry, expandable peat pellets are about the size of a silver dollar, but somewhat thicker. When placed in water, they swell to form a cylindrical container filled with peat moss, ready for seeding or transplanting.
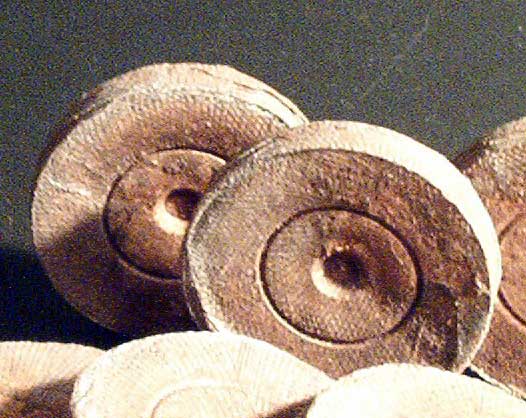
These may also be planted directly into the garden. Use the pellets in trays so they are easily watered and held upright. Be sure they are placed so the open side is up. A word of caution here. Hopefully you are aware that seeds and seedlings should not be allowed to dry out completely, they will die. Should the peat pellets get forgotten and dry out, it is VERY hard to re-wet them.
I have not tried this one personally, but I may have to one day.
Vermiculite. This material when used alone provides good seed germination. It is clean, and if not contaminated during handling, will not need sterilization. If other seeding mixes are used, it is useful for covering seeds. It does not form a crust, and seedlings can easily emerge.
Soilless mixtures. Mixes that contain no soil are available for growing seeds. These contain either a combination of peat moss and vermiculite or peat moss and perlite. Get the best stuff you can afford, there are some really cheap ones and the money you save here may cost you dearly in germination.
Now comes the hard part, you have the seeds, the containers and the soil medium, now what?
Fill the containers with the medium and stick the seed in, right? Not so fast. How deep should the seed be planted? I would venture a guess that millions and millions of seeds have been lost to rot because they were planted too deep. Trust me on this one, I probably have lost half that number.
The general rule of thumb is, twice to three times as deep as they are wide. I have come to the conclusion that I say "HUH"? to that general rule of thumb. Have you ever seen a lettuce seed? If you have bad eyesight, probably not.
I use this theory and my germination rates have improved 100 fold.
Small seeds, lettuce and such, are best planted by scattering them thinly over the surface of the soil and then patting them down. I usually water with a fine sprinkle and that helps set them in also.
Medium-sized seeds might include things like radishes, peas and beets. These are easier to see and can be planted their own width deep into the soil. Pat the soil down to firm it around the seed. Again, water them in.
If you are planting a large seed, maybe something like an almond or something like that, plant them as deep as they are long. Water in.
Experience will tell you that something is wrong. If you have planted 100 seeds and 3 have come up, you probably are too deep. There is a chance that you have old or expired seeds. If you are not sure, plant some more, but plant a little higher this time and see what happens.
You will want to place some kind of covering over the container. The seeds need warmth, humidity, moisture and a few things will need light to germinate. Do not place covered containers in direct sunlight. It will get way too hot and it will cook the seeds. Remember I told you about the mini greenhouse, they look like this:

Watch daily for germination. Move them to more direct light, and remove plastic or glass coverings as soon as germination is well underway, usually when you see the first set of true leaves. The first leaves to appear when the small plant breaks the surface of the soil are not true leaves, they are cotyledons or seed leaves. These are filled with starch and other things the plant needs at the beginning of life.
This will also be the time to thin your young seedlings. As difficult as it is, if you planted two or three seeds in a hole, some of them will have to go. They will just compete with each other and in the end make for a weak plant.
When it is time to transplant the seedlings into their new home, care should be taken. Lift seedlings by the rootball, using a spoon or plant tag for support if necessary. Never hold the seedling by its stem, as you may crush it. If you feel the need to steady the plant from above lightly hold the plant by a leaf. A seedling that has lost a leaf can grow another, but a seedling that has lost its stem cannot survive.
One problem I seem to always encounter is sunburn of my plants. I get so eager to get these things growing that I push the timetable.

Plants which have been growing indoors cannot be planted abruptly into the garden without danger of injury. To prevent damage, they should be hardened off before planting outdoors. Ideally, about two weeks before planting outdoors, start hardening off the seedlings by moving them outside for increasingly longer periods each day. Start by putting them outside for a few hours in the shade during the warmth of the afternoon. Choose a spot protected from wind. Bring them back inside for the night before temperatures start to drop. Each day, leave the plants out a little longer, and expose them to a little more direct sunshine. By the end of two weeks, unless freezing temperatures are forecast, the seedlings can stay outside in a sunny area until you are ready to transplant them into the garden.
Starting seeds has so many pros to it. They are much cheaper to buy than plant starts. You can get a much wider variety of things to grow, the big box stores can only carry just so many varieties of already grown plants. The satisfaction you will get knowing that you started a plant that has pounds of something edible on it from a seed is immeasurable. It is also a great way to get your kids involved in something wholesome.
I will leave you today with one other tidbit of useful information. My mother will surely think this is aimed at her, and to a large degree it is, TAG YOUR PLANTS!!
I promise you, even if you only plant one kind of pepper or one kind of tomato, you will forget what the name of it is. I hear my mother now, "but I know that it is a pepper or a tomato, why do I need to know what it's name is?"
For everybody else in the world, you will want to know what the name of it is so if it does not grow well for you, it does not get planted again next year.
Happy Growing!
Darren