WARNING: THIS WILL BE AN INTENSE DEEP READ
I was reading an article the other day from the University of Florida about Citrus Greening and the insect that spreads it, the Asian Citrus Psyllid. The article was more about the worry that these critters are starting to show resistance to the insecticides. The levels that have been documented to date are not high enough to cause product failures. Yet.
This got me to thinking about the insecticides that the average homeowner is using. In Florida and anywhere else commercial crops are grown, the farmers have a vast array of insecticides at their disposal. The homeowner, not so much.
Let me start with a couple of definitions.
Insecticide: a substance used for killing insects.
Insecticide resistance: an increase over time in the ability of an insect population to survive an insecticide application.
Some insects are going to naturally have a resistant gene to certain chemicals. Think of the situation that some people are allergic to peanuts and others are not. The ones that are not, have a resistance to the peanut chemical. This is a weak example, but gets my point across.
Insects with a resistance gene survive an application of insecticide and pass the resistance trait on to their offspring. If you continue using the same kind of insecticide that has the same Mode of Action,(more on that in a minute)the resistant individuals will continue to breed and the proportion of resistant insects in the population increases, while susceptible, or ones that don't have the gene are eliminated by the insecticide.
I know, what the heck did he just say?!
Pesticides are seldom 100% effective, so there are always a few individuals that can survive and reproduce. Survivors may have been able to detoxify the pesticide or are immune to the effect of the pesticide or can avoid the pesticide application altogether. If survivors mate and past on this resistance to their offspring, future generations will have fewer susceptible individuals. As time progresses, the entire population may become resistant.
This brings me back to the MoA or Mode of Action. Insecticides all work in different ways. I am not going to get major geek on you here, but some of the ways that they work and on what part of the insects body are,
The Nervous System: Most traditional insecticides attack the nervous system of insects. It interferes with their nerve fibers or the gap between the fibers.
Energy Production: These chemicals significantly slow the production of energy that an insect needs to survive. It basically starves them. The insects “run out of gas” and can even die standing on their feet.
Cuticle Production: Insects wear their skeleton on the outside of their body. Chitin is a major component of their skeleton. Chemicals called chitin synthesis inhibitors,slow or stop the production of chitin. Without chitin, the insect cannot molt,(shed it’s exoskeleton and re-grow a new one) and will soon die.
Endocrine System: Insect growth regulators,act on the hormone or endocrine system of insects. Juvenile hormones keep insects from molting (shedding their exoskeleton) until the insect reaches the proper state of maturity. They don’t allow the insect to molt at the proper time, keeping the insect from maturing and reproducing.
Water Balance: Insects have a thin waxy coating over their exoskeleton to prevent water loss. Some chemicals absorb the waxy coating, resulting in rapid water loss and eventual death.
There are many more, but you get the idea.
So now, you are wondering, how does this affect me? The chemicals are broken down into groups, 25 or so to be exact. You need to alternate between groups, NOT just name brands.
Here is an example of what I mean. Group one is Carbamates and Organophosphates, it is broken down into sub-groups A&B. Stay with me here. Sevin, a common insecticide, is in this category. A good product. It interrupts the transmission of nerve impulses. So, to avoid a resistance problem, you want to switch to something else....Good Idea!
You grab some Malathion...Bad Idea! This is in the same group and is the same way of killing the bugs. Ideally, an effective insecticide should be applied at a concentration high enough (following the label directions) to kill all the individuals in a population. However, it should only be applied twice before switching to another group.
Maybe going to the Insecticidal soaps, which will dry the insect out. You can also go to the Horticultural oils, which will suffocate the insect. Okay, so now you are asking, how do they become resistant to the soaps and oils? They will develop a sense of the danger and will move away from the chemical. If you do not hit them directly they may move to the under side of the leaf or a part of the plant that was not sprayed.
I know this may sound a little confusing, and yes it probably is WAY too detailed.
My point today is this, try to attract beneficial bugs to your yard first. Flowers and plants that they like are a good step forward. If that doesn't help, start with the most gentle of insecticides, soaps and oils. If you must go to the nuclear option of chemicals, keep in mind that you might be contributing to the evolution of a Super Bug. Then a nuclear bomb might be the only way to rid yourself of them!
Your best bet is to get to know a little bit more about the different classes and how the Modes of Action work. A good website is: MOA's
Oh, and just as a side note....Fungicides can also have resistance issues, but that is fodder for another blog.
Happy Growing!
Darren
Sunday, July 24, 2011


Sunday, July 10, 2011
Serious Cereus
Everybody needs a helping hand at times, right? What if you do all of your important stuff at night and there are very few people around? That is kind of the boat that today's topic finds itself in.
Epiphyllum oxypetalum also known as Dutchman's Pipe Cactus, Orchid Cactus and Night Blooming Cereus is an epiphyte. This is a plant that grows on another plant which it depends on for mechanical support but not for nutrients. A helping hand type of thing. And of course it's other common name,night blooming cereus, kind of gives it away as to what time of the day it flowers.
This plants native range runs from Mexico to Brazil. It can be a very large grower, getting up to 20 feet tall, or long depending on how you look at it. It prefers to grow in the upper story of tropical jungles by clinging to trees by means of aerial roots. It produces dark green branches and fragrant white flowers, no wonder it is also known as Queen of the Night.


The leaf-like structures are actually flattened stems, generally called cladophylls.
You will want to fertilize the plants on a monthly basis with a balanced fertilizer diluted to 1/2 the strength recommended on the label. Do not use a fertilizer too high in nitrogen, the first number should not be over 10. It can cause the growth to be mushy. Do not fertilize during the Winter.
The Epiphyllum oxypetalum is an easy and fast growing epiphyte. They can be propagated from cuttings. Dip the cuttings in rooting hormone before planting in moist, but not soggy, soil mix.
This would be a good candidate for a cutting:

The smaller leaf off to the right is the one I am talking about. They can also be propagated by dividing large plants. It generally takes 2–3 years to raise a blooming size plant from a rooted cutting.
As for pests, there are a few. Scale and mealybugs start the list, they can be controlled with insecticidal soap. Snails and slugs love epiphyllums! They can skeletonize the leaves in a short time and will do lots of damage. That is why these plants should never be allowed to grow on the ground. Snail bait should be put out on a regular basis. Please read the label regarding these products.
This plant can definitely bring a huge WOW factor to any house or yard. It is one of the easiest to grow. There is one more nice bonus to this plant, SHOULD you be lucky enough to have it happen. Once the Queen flowers and IF she happens to get pollinated, usually by moths and sometimes bats, it will produce fruit and it IS edible!
Kinda looks like this:

Darren
Sunday, July 3, 2011
Boring
Here in my part of the world, gardens have kind of slowed down a touch, due to the extreme hot weather. In other parts of the country, gardens are pretty much in full swing. I decided to take a chance and planted a third crop of Cucumbers, along with some Hubbard Squash, Zucchini and Dills Atlantic Pumpkins.
As a side bar, if you are unfamiliar with the Dills Atlantic Pumpkin, this is the one that regularly produces world record size pumpkins. The current world record was grown in Wisconsin and weighed 1810.5 pounds. The current South Carolina record is 1164 pounds. If you are curious as to your state record, you can find them all here: State Pumpkin Records
In order to grow large pumpkins or any other type of squash and cucumber, you need to be aware of a really boring critter....Melittia cucurbitae or Squash Vine Borer.
This pest ranges from Canada to Argentina, with the possibility of southern states having two broods a year, and is the most serious enemy of squashes,(Summer and Winter) as well as pumpkins and gourds. Cucumbers and melons are less frequently affected. Though they will hit these if hungry enough.
The adult borer resembles a wasp, even though it is a moth. It is about 1/2 inch long with an orange abdomen and black dots. The hind legs are fringed with black and orange hairs.
 Eggs are flat, brown, and about 1/25 inch long. The larvae are white or cream colored with brown heads, growing to almost an inch in length.
 Beginning in late June or early July, late May in the South, Squash Vine Borer adults emerge from cocoons in the ground. They are an unusual moth because they are a diurnal species, which means they fly during the day, unlike most moths that fly at night.
The female will lays eggs on any and all parts of the plant, except the upper leaf surface. The majority of eggs are laid on the basal stem (plant base). Hatching larvae usually bore directly into the stem and feed internally for about 4-6 weeks, though some may feed externally prior to entering the stem.
The damage they do is caused by the larvae feeding through the center of the stems, blocking the flow of water to the rest of the plant. Plants wilt and usually rot and die beyond the point of attack. The first indication of an attack will be the sudden wilting of a long runner or of the entire plant. Closer observation of a wilting plant often reveals holes near the base of the plant filled with moist greenish or orange sawdust like material called frass, basically, bug excrement.
 Once this pest invades your plant, pesticides are ineffective. There are those out there that have had some success when an infestation occurs. You can slit the infested vine lengthwise and remove borers or kill them with a long pin or needle. The slitting operation does not always work because you can miss one or two borers, and the plant is usually too weak to save at that point anyway.
The use of row covers before flower bloom can be effective, unless borers from previous seasons have entered your soil and pupated.
One method that I have heard about, and will try this year, is this,as soon as your vine starts to lay down from the weight of the plant, place aluminum foil on the ground underneath the stem at the base to disorient the arriving moths. This sounds somewhat reasonable, again, as long as the larvae from last year have not entered the vine yet. You can till the soil in late Winter to expose overwintering insects if you have had previous experiences. Rotating squash to another location in the garden each season is another good option.
Insecticides can be also be useful in killing the moths before they lay eggs. Caution should be used however, it will also kill your pollinators. Remember to follow the label directions! Ideally, you will want to monitor for the moths and apply the insecticide after the plant stops flowering. Observation is the key here. Adults make a very noticeable buzzing sound when flying. You can also use yellow trap pans to detect Squash Vine Borer adults. This can be any container (pan, pail, bowl) colored yellow and filled with water. Because Squash Vine Borer adults are attracted to yellow, they will fly to the container and be trapped when they fall into the water.
There are certain squash varieties that offer an apparent resistance to and tolerance of borer attack. Some of these include, Summer Crookneck and Butternut. Some of their favorites include, Hubbard type squash, Connecticut Field Pumpkin, Small Sugar Pumpkin, and Zucchini.
Hopefully you will not have to deal with this pest and can either compete for the worlds largest pumpkin or have enough Zucchini to supply the neighborhood.
Happy Growing!
Darren
As a side bar, if you are unfamiliar with the Dills Atlantic Pumpkin, this is the one that regularly produces world record size pumpkins. The current world record was grown in Wisconsin and weighed 1810.5 pounds. The current South Carolina record is 1164 pounds. If you are curious as to your state record, you can find them all here: State Pumpkin Records
In order to grow large pumpkins or any other type of squash and cucumber, you need to be aware of a really boring critter....Melittia cucurbitae or Squash Vine Borer.
This pest ranges from Canada to Argentina, with the possibility of southern states having two broods a year, and is the most serious enemy of squashes,(Summer and Winter) as well as pumpkins and gourds. Cucumbers and melons are less frequently affected. Though they will hit these if hungry enough.
The adult borer resembles a wasp, even though it is a moth. It is about 1/2 inch long with an orange abdomen and black dots. The hind legs are fringed with black and orange hairs.


The female will lays eggs on any and all parts of the plant, except the upper leaf surface. The majority of eggs are laid on the basal stem (plant base). Hatching larvae usually bore directly into the stem and feed internally for about 4-6 weeks, though some may feed externally prior to entering the stem.
The damage they do is caused by the larvae feeding through the center of the stems, blocking the flow of water to the rest of the plant. Plants wilt and usually rot and die beyond the point of attack. The first indication of an attack will be the sudden wilting of a long runner or of the entire plant. Closer observation of a wilting plant often reveals holes near the base of the plant filled with moist greenish or orange sawdust like material called frass, basically, bug excrement.

The use of row covers before flower bloom can be effective, unless borers from previous seasons have entered your soil and pupated.
One method that I have heard about, and will try this year, is this,as soon as your vine starts to lay down from the weight of the plant, place aluminum foil on the ground underneath the stem at the base to disorient the arriving moths. This sounds somewhat reasonable, again, as long as the larvae from last year have not entered the vine yet. You can till the soil in late Winter to expose overwintering insects if you have had previous experiences. Rotating squash to another location in the garden each season is another good option.
Insecticides can be also be useful in killing the moths before they lay eggs. Caution should be used however, it will also kill your pollinators. Remember to follow the label directions! Ideally, you will want to monitor for the moths and apply the insecticide after the plant stops flowering. Observation is the key here. Adults make a very noticeable buzzing sound when flying. You can also use yellow trap pans to detect Squash Vine Borer adults. This can be any container (pan, pail, bowl) colored yellow and filled with water. Because Squash Vine Borer adults are attracted to yellow, they will fly to the container and be trapped when they fall into the water.
There are certain squash varieties that offer an apparent resistance to and tolerance of borer attack. Some of these include, Summer Crookneck and Butternut. Some of their favorites include, Hubbard type squash, Connecticut Field Pumpkin, Small Sugar Pumpkin, and Zucchini.
Hopefully you will not have to deal with this pest and can either compete for the worlds largest pumpkin or have enough Zucchini to supply the neighborhood.
Happy Growing!
Darren
Sunday, June 26, 2011
House AND Garden?
I am a lucky person in some aspects. I still get to have weekly conversations with my mother, every Saturday she calls me. We talk for hours on all kinds of things, politics, family stuff, work, weather, but mostly we talk gardening and what is going on in our respective yards. This past weekend the topic of houseplants came up. I remember growing up, my mother and grandmother had, what seemed like to a young boy, thousands of houseplants. I even dabbled with a few back then.
We mentioned a couple that you just don't see very much anymore, Pocketbook plant (Calceolaria herbeohybrida) and Lipstick plant (Aeschynanthus pulcher). I am sure that I will get letters from people saying that they see them all the time. My mother and I each live in one of the Carolinas and peruse the garden and nursery areas on a regular basis, we just don't see them anywhere.
Anyway, after having this conversation, I got thinking about other plants that we grew as houseplants up in New Jersey. Yup, I am an original Yankee.....Don't hold that against me!! LOL
One of the plants that came to mind was Coleus (Solenostemon spp.)
These plants are natives of Tropical Africa, Asia, Australia, the East Indies, the Malay Archipelago, and the Philippines. As members of the Mint family of plants (Lamiaceae), Coleuses are close relatives of peppermint, spearmint, salvia, basil, thyme, oregano, and Swedish ivy.
Coleuses are grown for their colorful variegated leaves, typically with sharp contrast between the colors; the leaves may be green, pink, yellow, black (a very dark purple), maroon, and red.
There are many known species and many, many cultivars. There are new ones being introduced constantly with an array of color combinations.

Coleuses are considered one of those plants that practically anybody can grow. It was first introduced to the horticultural world in 1825, it has always been popular, and was especially prized as a garden plant in the Victorian era.
Most coleus will grow best in part shade or dappled light. There are several sun tolerant cultivars available that will thrive in full, hot sun. The colors of the plant are typically more intense in shaded areas however.
Treated as annuals, they will grow in Zones 1-11. In mild areas (no snow in Winter), plants can usually be kept as perennials if well taken care of. They are notoriously susceptible to cold weather and just a prediction of frost will kill them. Because I am sure there are people out there that will believe it, that last sentence was a joke.
Coleus prefer a rich, moist, well-drained soil. As long as there are no extremes in pH or soil moisture (too wet or dry) they should adapt to pretty much anything.
Fertilize in June, July and August with a liquid fertilizer at half the usual dilution.
 This is one of my favorite cultivars. It is called 'Kong Red'.
Coleuses are usually pretty easy to find in any garden center or nursery. If you have a friend that already grows some, you are in luck. Coleuses are very easy to propagate.
These plants have a tendency to become leggy, unless you cut them back occasionally. Cutting them back will cause them to become fuller and more dense. It is these cuttings that you are after to produce more plants. Three or four inch long cuttings will readily produce roots, even in a glass of water. The better way to do it is to use some rooting hormone and stick them in an equal mixture of sand and peat. These roots will be better adapted to growing in soil as apposed to water. Seeds are also a cheap and easy way to propagate Coleuses. While you can completely reproduce your favorite ones from cuttings, the benefit of buying a package of seeds is you will get an array of colors. Coleus seeds are very tiny. The trick to getting them to germinate is, not to bury them. Sprinkle the seeds on the top of the soil and just pat them down to gain contact with the soil. Water in thoroughly.
In the late Summer, spikes with blue to lilac flowers will appear. The foliage is the show here, not the flowers.

Many people dislike their appearance, and if allowed to go to seed the plant will decline. To alleviate this problem, it is as easy as pinching off the flower bud as soon as it appears.
Coleuses are pretty much problem free. Some pests to watch for include mealy bug, aphids and whitefies. Insecticidal soap will take care of these. Some disease problems to watch for include stem rot and root rot. As long as you water correctly, these should not be an issue.
This whole conversation started today with houseplants. I don't know when it happened, but, like I stated at the beginning, I only ever knew of Coleuses as houseplants. Here in the South, and maybe elsewhere, they have turned into this huge multi-million dollar annual yard plant. Flats and flats of them are sold every year, yet, you never see them sold as houseplants. They do still work for this purpose.
To grow them this way, your Coleuses should be planted in a light, quick draining, commercial potting soil. Place it where it will receive several hours of bright light, such as a South or East window. You can also provide artificial lighting with plant lights for best leaf color, and fullest plant. One other thing to remember if growing them as houseplants, Coleus vary from smaller types that will reach only 1 foot in height to tall bushy types of 3 feet. There are some sprawling types suitable for hanging baskets, these can still reach 3 feet in length.
Please don't forget to feed them inside too, probably once a month or so, with a dilution of half strength, water soluable houseplant fertilizer.
I hope you go out and try to find yourself some of these extremely beautiful plants. There really are many, many cultivars to choose from, with awesome sounding names like: 'Plum Parfait', 'Solar Eclipse', 'Fishnet Stockings' and 'Freckles'.
I knew somebody would ask, here is what Fishnet Stockings looks like:
 Courtesy of Clemson Extension
As a final note, I stumbled across a cultivar I have never seen in real life, only a picture. If anybody ever sees this or knows where I can get one.....Please let me know!

Happy Growing!
Darren
We mentioned a couple that you just don't see very much anymore, Pocketbook plant (Calceolaria herbeohybrida) and Lipstick plant (Aeschynanthus pulcher). I am sure that I will get letters from people saying that they see them all the time. My mother and I each live in one of the Carolinas and peruse the garden and nursery areas on a regular basis, we just don't see them anywhere.
Anyway, after having this conversation, I got thinking about other plants that we grew as houseplants up in New Jersey. Yup, I am an original Yankee.....Don't hold that against me!! LOL
One of the plants that came to mind was Coleus (Solenostemon spp.)
These plants are natives of Tropical Africa, Asia, Australia, the East Indies, the Malay Archipelago, and the Philippines. As members of the Mint family of plants (Lamiaceae), Coleuses are close relatives of peppermint, spearmint, salvia, basil, thyme, oregano, and Swedish ivy.
Coleuses are grown for their colorful variegated leaves, typically with sharp contrast between the colors; the leaves may be green, pink, yellow, black (a very dark purple), maroon, and red.
There are many known species and many, many cultivars. There are new ones being introduced constantly with an array of color combinations.

Coleuses are considered one of those plants that practically anybody can grow. It was first introduced to the horticultural world in 1825, it has always been popular, and was especially prized as a garden plant in the Victorian era.
Most coleus will grow best in part shade or dappled light. There are several sun tolerant cultivars available that will thrive in full, hot sun. The colors of the plant are typically more intense in shaded areas however.
Treated as annuals, they will grow in Zones 1-11. In mild areas (no snow in Winter), plants can usually be kept as perennials if well taken care of. They are notoriously susceptible to cold weather and just a prediction of frost will kill them. Because I am sure there are people out there that will believe it, that last sentence was a joke.
Coleus prefer a rich, moist, well-drained soil. As long as there are no extremes in pH or soil moisture (too wet or dry) they should adapt to pretty much anything.
Fertilize in June, July and August with a liquid fertilizer at half the usual dilution.

Coleuses are usually pretty easy to find in any garden center or nursery. If you have a friend that already grows some, you are in luck. Coleuses are very easy to propagate.
These plants have a tendency to become leggy, unless you cut them back occasionally. Cutting them back will cause them to become fuller and more dense. It is these cuttings that you are after to produce more plants. Three or four inch long cuttings will readily produce roots, even in a glass of water. The better way to do it is to use some rooting hormone and stick them in an equal mixture of sand and peat. These roots will be better adapted to growing in soil as apposed to water. Seeds are also a cheap and easy way to propagate Coleuses. While you can completely reproduce your favorite ones from cuttings, the benefit of buying a package of seeds is you will get an array of colors. Coleus seeds are very tiny. The trick to getting them to germinate is, not to bury them. Sprinkle the seeds on the top of the soil and just pat them down to gain contact with the soil. Water in thoroughly.
In the late Summer, spikes with blue to lilac flowers will appear. The foliage is the show here, not the flowers.
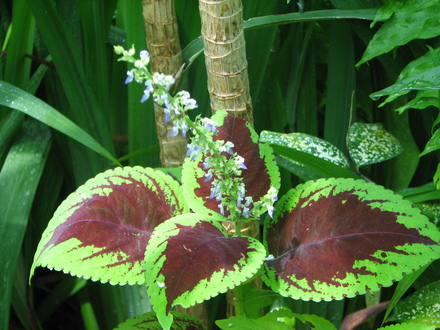
Many people dislike their appearance, and if allowed to go to seed the plant will decline. To alleviate this problem, it is as easy as pinching off the flower bud as soon as it appears.
Coleuses are pretty much problem free. Some pests to watch for include mealy bug, aphids and whitefies. Insecticidal soap will take care of these. Some disease problems to watch for include stem rot and root rot. As long as you water correctly, these should not be an issue.
This whole conversation started today with houseplants. I don't know when it happened, but, like I stated at the beginning, I only ever knew of Coleuses as houseplants. Here in the South, and maybe elsewhere, they have turned into this huge multi-million dollar annual yard plant. Flats and flats of them are sold every year, yet, you never see them sold as houseplants. They do still work for this purpose.
To grow them this way, your Coleuses should be planted in a light, quick draining, commercial potting soil. Place it where it will receive several hours of bright light, such as a South or East window. You can also provide artificial lighting with plant lights for best leaf color, and fullest plant. One other thing to remember if growing them as houseplants, Coleus vary from smaller types that will reach only 1 foot in height to tall bushy types of 3 feet. There are some sprawling types suitable for hanging baskets, these can still reach 3 feet in length.
Please don't forget to feed them inside too, probably once a month or so, with a dilution of half strength, water soluable houseplant fertilizer.
I hope you go out and try to find yourself some of these extremely beautiful plants. There really are many, many cultivars to choose from, with awesome sounding names like: 'Plum Parfait', 'Solar Eclipse', 'Fishnet Stockings' and 'Freckles'.
I knew somebody would ask, here is what Fishnet Stockings looks like:

As a final note, I stumbled across a cultivar I have never seen in real life, only a picture. If anybody ever sees this or knows where I can get one.....Please let me know!
Happy Growing!
Darren
Sunday, June 19, 2011
Respect the Elders
No, today's article is not about respecting your elders, as in your parents, grandparents and such, though you should! They can impart a GREAT deal of knowledge and wisdom from their vast experiences.
No, today we are venturing into the world of an underrated fruiting plant, Sambucus canadensis, or Elderberry.
The Elderberry is one of the most common fruit-bearing, native shrubs of North America. In fact, Elderberries were once so common, people considered them a "ditch weed". Native Americans ate them and used various parts of the plant for medicinal purposes. All parts of the Elderberry have long enjoyed a strong medicinal reputation on their own merits, however, ONLY the berries and flowers are recommended for internal use today.
 Flowers
 Fruit
Fruit
The two most common types of Elderberries available are the European Elderberry (Sambucus nigra) and the American Elderberry (Sambucus canadensis). The American Elderberry is the wild species often found growing in old fields and meadows. It grows 10 to 12 feet tall and wide and is hardy in zones 3 to 9. The European Elderberry grows up to 20 feet tall and wide depending on the variety, it blooms earlier than the American species, it is hardy in zones 4 to 8, and some have pink flowers.
Elderberries grow best in moist, fertile, well-drained soil with a pH between 5.5 and 6.5, but will tolerate a wide range of soil textures, fertility, and acidity. They do not like constantly wet feet, it is a myth that they prefer swampy areas, though they love moisture, so make sure the area is well-drained. They are shallow rooted, so keep an eye on the moisture level.
Best grown in full sun, though they can be grown in shaded locations with good air circulation around the plants to reduce leaf and disease problems.
Elderberries are considered partially self-fruitful. Two or more cultivars should be planted near each other to provide for cross-pollination. This is for a heavier fruit crop. I do not know if I have a freak plant or there are some somewhere in the neighborhood, but I have one plant and it fruits pretty heavy. I am thinking of getting another cultivar just to see if I get more fruit.
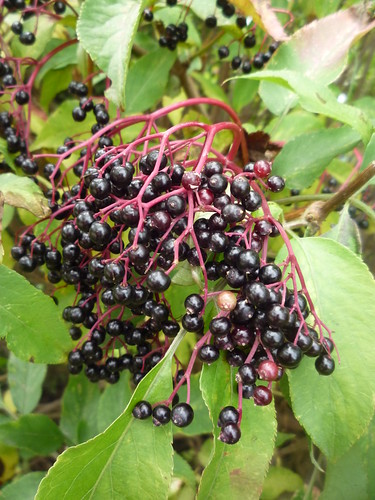
There are 10-inch clusters of tiny fragrant cream-colored flowers that cover the shrub in Summer and the dark purple fruit appears in the later part of Summer. I grow mine in a container. The flowers started in Early to Mid-Spring and I am harvesting fruit by middle June. I am assuming this is because the soil is much warmer in a container. The wild Elderberries in the area are still in heavy flower while I am picking fruit.
Elderberries respond well to fertilization. In addition to incorporating manure or compost before planting, apply additional fertilizer annually in early Spring. A balanced 10-10-10 fertilizer is adequate.
Pruning is relatively simple. Elderberries send up many new canes each year. The canes usually reach full height in one season and develop lateral branches in the second. Flowers and fruit develop on the tips of the current season's growth. In late Winter to early Spring while the plants are dormant, remove all dead, broken or weak canes, plus all canes more than three years old.
Elderberries make nice landscape plants. They perform well as a tall, deciduous hedge or windscreen. If growing the shrub for its fruit however, look for the cultivars "Adams" "Nova" or "York." These produce heavy crops.
Harvest elderberry fruit when they turn to a dark purple color. When ripe, the entire cluster should be removed and the berries stripped from the cluster. The berries are rarely eaten raw, primarily because of their astringent flavor, which is greatly improved by cooking. They can be used like blueberries in pies, muffins, pancakes, teas and a wealth of other things. If pectin and plenty of sugar are added, they make good jam and jelly. The berries can also be dried and added to oatmeal as it cooks. Most people know the Elderberry for the wine it makes.
There are a few disease and pest problems associated with Elderberries.
Tomato ringspot virus is spread by nematodes and by pollen transfer. Infected plants may seem weakened and have reduced productivity. A soil test for the presence of Xiphinema nematodes before establishing a large planting of elderberry should be done to guard against this disease.
Fungal stem cankers are caused by many different fungi. A canker can girdle a stem, causing the tissue above the canker to die. Stressful conditions such as Winter injury, drought, and flooding, are causes that lead to infection. The infected shoots should be removed and properly disposed of to prevent the spread.
Powdery mildew fungi may attack certain years, though it is not a serious problem.
Certain species of aphids feed on Elderberry. Usually only a few branch tips are involved, but the feeding may result in distorted leaves. If aphids become problematic, wash them from the plants with a strong spray of water, or prune out and destroy the infested areas. Horticultural oil and Insecticidal Soaps are another option.
The larval stage of the Elder Shoot Borer is a worm that bores into the stems and shoots. The adult moth lays eggs in canes at least one year old around Mid-Summer. Eggs hatch the following Spring. An effective control method is to prune out infested shoots and canes. Destroy all pruned material.
I won't even mention Birds....you are better to just go ahead and put a net over the plant...you won't win otherwise.
To me, it is amazing that this fruit is not utilized more. A half of a cup of Elderberries has only 73 calories, but is loaded with vitamin C and A, Potassium and Viburnic acid which is beneficial for asthma, bronchitis and nasal congestion. Some people add elderberries to their diet when they feel a cold or flu coming on and swear that it shortens the duration and lessens the symptoms. See if you can find some in your area and plant some. It might be difficult, due to lack of demand. If you find some wild Elderberries, they can be rooted. Root cuttings of pencil diameter size, four to six inches long, they may be dug in late Winter before growth begins. Place cuttings horizontally in a pot and cover with one inch of light soil or soilless medium and keep warm and moist. You can expect yields of 12 to 15 pounds of fruit per mature (3 to 4 year old) shrub, if grown properly. That is sure a lot of healthy!
Happy Growing!
Darren
No, today we are venturing into the world of an underrated fruiting plant, Sambucus canadensis, or Elderberry.
The Elderberry is one of the most common fruit-bearing, native shrubs of North America. In fact, Elderberries were once so common, people considered them a "ditch weed". Native Americans ate them and used various parts of the plant for medicinal purposes. All parts of the Elderberry have long enjoyed a strong medicinal reputation on their own merits, however, ONLY the berries and flowers are recommended for internal use today.

The two most common types of Elderberries available are the European Elderberry (Sambucus nigra) and the American Elderberry (Sambucus canadensis). The American Elderberry is the wild species often found growing in old fields and meadows. It grows 10 to 12 feet tall and wide and is hardy in zones 3 to 9. The European Elderberry grows up to 20 feet tall and wide depending on the variety, it blooms earlier than the American species, it is hardy in zones 4 to 8, and some have pink flowers.
Elderberries grow best in moist, fertile, well-drained soil with a pH between 5.5 and 6.5, but will tolerate a wide range of soil textures, fertility, and acidity. They do not like constantly wet feet, it is a myth that they prefer swampy areas, though they love moisture, so make sure the area is well-drained. They are shallow rooted, so keep an eye on the moisture level.
Best grown in full sun, though they can be grown in shaded locations with good air circulation around the plants to reduce leaf and disease problems.
Elderberries are considered partially self-fruitful. Two or more cultivars should be planted near each other to provide for cross-pollination. This is for a heavier fruit crop. I do not know if I have a freak plant or there are some somewhere in the neighborhood, but I have one plant and it fruits pretty heavy. I am thinking of getting another cultivar just to see if I get more fruit.
There are 10-inch clusters of tiny fragrant cream-colored flowers that cover the shrub in Summer and the dark purple fruit appears in the later part of Summer. I grow mine in a container. The flowers started in Early to Mid-Spring and I am harvesting fruit by middle June. I am assuming this is because the soil is much warmer in a container. The wild Elderberries in the area are still in heavy flower while I am picking fruit.
Elderberries respond well to fertilization. In addition to incorporating manure or compost before planting, apply additional fertilizer annually in early Spring. A balanced 10-10-10 fertilizer is adequate.
Pruning is relatively simple. Elderberries send up many new canes each year. The canes usually reach full height in one season and develop lateral branches in the second. Flowers and fruit develop on the tips of the current season's growth. In late Winter to early Spring while the plants are dormant, remove all dead, broken or weak canes, plus all canes more than three years old.
Elderberries make nice landscape plants. They perform well as a tall, deciduous hedge or windscreen. If growing the shrub for its fruit however, look for the cultivars "Adams" "Nova" or "York." These produce heavy crops.
Harvest elderberry fruit when they turn to a dark purple color. When ripe, the entire cluster should be removed and the berries stripped from the cluster. The berries are rarely eaten raw, primarily because of their astringent flavor, which is greatly improved by cooking. They can be used like blueberries in pies, muffins, pancakes, teas and a wealth of other things. If pectin and plenty of sugar are added, they make good jam and jelly. The berries can also be dried and added to oatmeal as it cooks. Most people know the Elderberry for the wine it makes.
There are a few disease and pest problems associated with Elderberries.
Tomato ringspot virus is spread by nematodes and by pollen transfer. Infected plants may seem weakened and have reduced productivity. A soil test for the presence of Xiphinema nematodes before establishing a large planting of elderberry should be done to guard against this disease.
Fungal stem cankers are caused by many different fungi. A canker can girdle a stem, causing the tissue above the canker to die. Stressful conditions such as Winter injury, drought, and flooding, are causes that lead to infection. The infected shoots should be removed and properly disposed of to prevent the spread.
Powdery mildew fungi may attack certain years, though it is not a serious problem.
Certain species of aphids feed on Elderberry. Usually only a few branch tips are involved, but the feeding may result in distorted leaves. If aphids become problematic, wash them from the plants with a strong spray of water, or prune out and destroy the infested areas. Horticultural oil and Insecticidal Soaps are another option.
The larval stage of the Elder Shoot Borer is a worm that bores into the stems and shoots. The adult moth lays eggs in canes at least one year old around Mid-Summer. Eggs hatch the following Spring. An effective control method is to prune out infested shoots and canes. Destroy all pruned material.
I won't even mention Birds....you are better to just go ahead and put a net over the plant...you won't win otherwise.
To me, it is amazing that this fruit is not utilized more. A half of a cup of Elderberries has only 73 calories, but is loaded with vitamin C and A, Potassium and Viburnic acid which is beneficial for asthma, bronchitis and nasal congestion. Some people add elderberries to their diet when they feel a cold or flu coming on and swear that it shortens the duration and lessens the symptoms. See if you can find some in your area and plant some. It might be difficult, due to lack of demand. If you find some wild Elderberries, they can be rooted. Root cuttings of pencil diameter size, four to six inches long, they may be dug in late Winter before growth begins. Place cuttings horizontally in a pot and cover with one inch of light soil or soilless medium and keep warm and moist. You can expect yields of 12 to 15 pounds of fruit per mature (3 to 4 year old) shrub, if grown properly. That is sure a lot of healthy!
Happy Growing!
Darren
Sunday, June 12, 2011
A Glorious Morning
I have this fence line along the front of the house that, for the past few years, has been used for growing Grapes. The Concord Grapes that I grew were wonderful! Sadly, Pierce Disease finally reared its ugly head and the plants died. This wasn't a shock, I knew it was coming, that is the problem with growing that type of Grape in South Carolina. But I digress.
I had grandiose plans of growing Passion Fruit (Passiflora edulis) up there this year.
At the rate the seedlings are growing, the new millennium will be here before they are even up to the first rail. So, what to do?
I had a friend of mine give me some Morning Glory seeds at one of the last plant swaps, they are of some beautiful colors, so why not!?

The Morning Glory, which is in the family Convolvulaceae contains at least 50 genera and more than 1000 species. Wild morning glories have been traced back to ancient China where they were used for medicinal and ceremonial purposes. It was introduced to the Japanese in the 9th century, and they were the first to cultivate it as an ornamental flower. Aztec civilizations used the juice of some morning glory species native to Central America to create rubber-like substances, according to the Massachusetts Institute of Technology.
Most Morning Glory flowers curl up and close during the warm parts of the day, and are fully open in the morning, thus their name. On a cloudy day, the flower may last until night.
In cultivation, most are treated as perennial plants in frost-free areas and as annual plants in colder climates, but some species tolerate winter cold. They are very easy to grow no matter where you live.
Morning Glories should be planted in full sun. They are a vine, and can reach 10 feet in length, so unless you want them sprawling across your yard, you will want to grow them against a fence or trellis. Because of their fast growth, twining habit, attractive flowers, and tolerance for poor, dry soils, some Morning Glories are excellent vines for creating Summer shade on building walls when trellised, thus keeping the building cooler and reducing cooling costs.

You should sow the seeds 1/2 inch deep, and 8 to 12 inches apart. Once planted, you can almost forget that they are there, practically thriving on neglect. Do not over water either.

Morning Glories have leaves that are heart-shaped, 4 - 5 inches long. The flowers which can be as much as 8 inches across, though most are around 4 inches, come in an array of colors. Blue, White, Pink, Red, Purple, Speckled and all combinations of these. The seeds that I planted are of a really unusual coloring.
This is what my cultivar 'Fujishibori' will look like:

According to the seed packets that I planted on the fence, I should have about 10 different color flowers, including the 'Fujishibori' listed above. Of course, this will greet my wife and I every morning when we leave for work. By the time we come home in the evening they will be gone. I have a solution for this. In the same area that I planted the Morning Glories, I also planted something else. Moonflower (Ipomea alba) which is a popular fragrant variety of Morning Glory. It opens in the evening with a sweet fragrance and lasts throughout the night until the morning sun comes along.

Then of course, the whole thing starts all over again.
Morning Glories produce round seed pods in clusters hanging from their vines.

The pods turn papery brown and become hard. The seeds themselves are dark-brown to matte-black, wedge shaped, and are sized between 1/8" and 1/4" long. I mention the seeds because, once you plant Morning Glories in your yard, you will find them reproducing themselves for YEARS!! This is actually the first time in eight years that I have actually "planted" them myself. I am still pulling volunteer plants from my garden. They NEVER seem to come back up where I want them. So I am offering this advice, be very careful when deciding whether to plant these beauties in your yard. Morning Glories can reproduce so much that, in the states of Arizona and Arkansas it is considered a Federal Noxious Weed, and technically it's illegal to grow, import, possess, or sell seeds.
I am not sure what the penalty is or if it is heavily enforced, but I wanted you to know that was out there. If you want to plant them, but are worried about the reseeding issues, there is a fairly easy solution. Immediately after the flowers fade and fall, or just as the seed pod is forming, pull it off before the pod turns brown and hard.
There are some significances associated with Morning Glory flowers. They represent the month of September as one of the official birth flowers (Asters being the other). Some couples like to give traditional flowers on their wedding anniversary or use the traditional flower in the decorations of an anniversary celebration. Morning Glories are used for the 11th wedding anniversary.
I hope you have enjoyed this adventure through a "Glorious Day"?
I will conclude this blog today with a picture of how the Morning Glory ends its day.

Happy Growing!
Darren
I had grandiose plans of growing Passion Fruit (Passiflora edulis) up there this year.
At the rate the seedlings are growing, the new millennium will be here before they are even up to the first rail. So, what to do?
I had a friend of mine give me some Morning Glory seeds at one of the last plant swaps, they are of some beautiful colors, so why not!?

The Morning Glory, which is in the family Convolvulaceae contains at least 50 genera and more than 1000 species. Wild morning glories have been traced back to ancient China where they were used for medicinal and ceremonial purposes. It was introduced to the Japanese in the 9th century, and they were the first to cultivate it as an ornamental flower. Aztec civilizations used the juice of some morning glory species native to Central America to create rubber-like substances, according to the Massachusetts Institute of Technology.
Most Morning Glory flowers curl up and close during the warm parts of the day, and are fully open in the morning, thus their name. On a cloudy day, the flower may last until night.
In cultivation, most are treated as perennial plants in frost-free areas and as annual plants in colder climates, but some species tolerate winter cold. They are very easy to grow no matter where you live.
Morning Glories should be planted in full sun. They are a vine, and can reach 10 feet in length, so unless you want them sprawling across your yard, you will want to grow them against a fence or trellis. Because of their fast growth, twining habit, attractive flowers, and tolerance for poor, dry soils, some Morning Glories are excellent vines for creating Summer shade on building walls when trellised, thus keeping the building cooler and reducing cooling costs.

You should sow the seeds 1/2 inch deep, and 8 to 12 inches apart. Once planted, you can almost forget that they are there, practically thriving on neglect. Do not over water either.

Morning Glories have leaves that are heart-shaped, 4 - 5 inches long. The flowers which can be as much as 8 inches across, though most are around 4 inches, come in an array of colors. Blue, White, Pink, Red, Purple, Speckled and all combinations of these. The seeds that I planted are of a really unusual coloring.
This is what my cultivar 'Fujishibori' will look like:
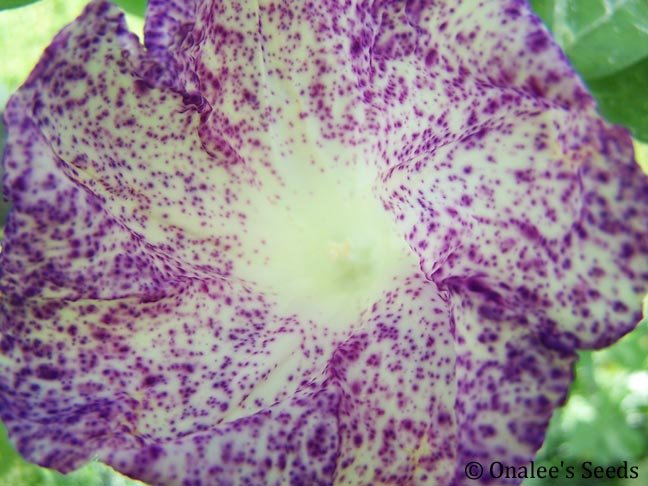
According to the seed packets that I planted on the fence, I should have about 10 different color flowers, including the 'Fujishibori' listed above. Of course, this will greet my wife and I every morning when we leave for work. By the time we come home in the evening they will be gone. I have a solution for this. In the same area that I planted the Morning Glories, I also planted something else. Moonflower (Ipomea alba) which is a popular fragrant variety of Morning Glory. It opens in the evening with a sweet fragrance and lasts throughout the night until the morning sun comes along.

Then of course, the whole thing starts all over again.
Morning Glories produce round seed pods in clusters hanging from their vines.

The pods turn papery brown and become hard. The seeds themselves are dark-brown to matte-black, wedge shaped, and are sized between 1/8" and 1/4" long. I mention the seeds because, once you plant Morning Glories in your yard, you will find them reproducing themselves for YEARS!! This is actually the first time in eight years that I have actually "planted" them myself. I am still pulling volunteer plants from my garden. They NEVER seem to come back up where I want them. So I am offering this advice, be very careful when deciding whether to plant these beauties in your yard. Morning Glories can reproduce so much that, in the states of Arizona and Arkansas it is considered a Federal Noxious Weed, and technically it's illegal to grow, import, possess, or sell seeds.
I am not sure what the penalty is or if it is heavily enforced, but I wanted you to know that was out there. If you want to plant them, but are worried about the reseeding issues, there is a fairly easy solution. Immediately after the flowers fade and fall, or just as the seed pod is forming, pull it off before the pod turns brown and hard.
There are some significances associated with Morning Glory flowers. They represent the month of September as one of the official birth flowers (Asters being the other). Some couples like to give traditional flowers on their wedding anniversary or use the traditional flower in the decorations of an anniversary celebration. Morning Glories are used for the 11th wedding anniversary.
I hope you have enjoyed this adventure through a "Glorious Day"?
I will conclude this blog today with a picture of how the Morning Glory ends its day.

Happy Growing!
Darren
Sunday, June 5, 2011
I Can Canna
The vast majority of my yard and garden consists of edibles. Be it either, veggies, herbs, Citrus trees or some other kind of fruit. I figure if I am going to bust my butt in the garden working so hard, I want something tangible from it. Now, before you flower people out there start busting my chops, I do have some appreciation for the brightly colored beauties. I have a pretty nice collection of Camellias and I understand the importance of the flowers for my bee friends. With that last statement in mind, I do try to grow some flowers for them. My wife also seems to enjoy them, who knew!?
Don't get me wrong, I enjoy some flowers as well as the next person. I also like the more unusual, be it flower or foliage. Today's topic might not be all that unusual, but it can look that way.
Canna or Canna lily, (though not a true lily) is a genus of nineteen species of flowering plants. These plants are close relatives to Gingers and Bananas.
There has been so much hybridization of these plants that most experts just classify them as Canna X generalis. In case you don't read Botaneese (not a real word) that means General Canna. There are hundreds of named cultivars, ranging from less than 30 inches to more than 8 feet in height. If you want color, then these plants are for you. They come in colors from creams and yellows, to oranges and reds, and with a colorful diversity of leaf patterns as well. Cannas bloom from early Summer until frost, if you remove old blossoms regularly so that they do not set seed.
This is what greeted me the other morning. Both of these pictures are from my Bengal Tiger Canna.

 Pretty huh?
Cannas are native to tropical and subtropical regions of the New World, from the Southern United States (Southern South Carolina on West to Southern Texas) and South to Northern Argentina.
They grow from a special modified root structure called a rhizome. A rhizome is the underground part of a horizontal stem of the plant that sends out roots from its nodes, kind of like a tuber, but not exactly.
They are very easy to grow.
They prefer full sun, 6-8 hours. They will however grow in part shade, an area which only receives 4-5 hours of sun. The flowers and foliage may not be as dramatic though.
You will want to feed them every 4 to 6 weeks throughout the growing season with a balanced fertilizer such as a 10-10-10 or a flower booster.
If you have a boggy area of your yard, this might be a plant to consider. Cannas like moist soil and will even thrive in boggy conditions. They can be grown in ordinary garden soils, but will need regular watering.
Listed as growing in Zones 8-12, they can be grown in colder areas, but where the ground freezes, either dig the rhizomes up for the Winter, or protect them with a thick layer of mulch. In cold climates, the rhizomes may be susceptible to rot.
They can be grown in containers, but will need to be divided at least every other year to avoid overcrowding. This is also how they are propagated. Dig up the rhizome, cut it up into a few pieces, making sure there is at least one "eye", kind of like a potato and plant them back again. Plant the rhizomes pieces 2-4 inches deep. Cannas do produce seed, but it is rather difficult to grow them from this means.
 Chocolate Cherry Canna
There are many named cultivars out there, way too many to mention here, but I am sure there is a color just for you.
'Ace of Spades' - red flowers
'Annjee' - mottled pink and gold flowers
'Camille Bernardin' - salmon over apricot flowers with blue green foliage
'Cleopatra' - orange over yellow flowers, sometimes producing a red petal or complete stem of red flowers
'Garton Baudie' - bright, orange red flowers
'Pfitzer's Confetti' - pale lemon flowers streaked with pink
'Una' - bright lolly pink flowers with gold edging
'Zebra' - red mottled flower
That is just a brief sampling of what you might be able to find.
I mentioned that they are easy to grow. They are also relatively pest free. They do sometimes however, fall victim to the Canna Leaf Roller and the resultant leaf damage. While not fatal to the plant, it does make for a nasty looking one.

To control, or if there is extensive damage, get some Bacillus thuringiensis or BT.
Any good garden center or nursery will know what it is. Please follow label directions.
Other pests: Slugs and snails are fond of Cannas and can leave large holes in the leaves, preferring the tender young leaves that have not yet unfurled.
Red Spider Mites can also be a problem during a very hot, long Summer.
Japanese beetles can also ravage the leaves if left uncontrolled.
Each of these pests have there own method of control, look on the label for each one specified.
Cannas are remarkably free of disease, compared to many other flowers. However, they can fall victim to Canna Rust, which is a fungal disease caused by Puccinia thaliae. Symptoms include orange spots on the plant's leaves and stems. In advanced stages of infection, the upper leaf surface spots come together, turn dark brown to black and finally, the infected leaves become dry and fall off.
 Canna Rust
When Canna rust first appears, the affected foliage should be removed and discarded, otherwise the fungi will propagate and destroy the whole plant. The affected foliage should not be composted, because most home compost bins do not get hot enough to kill off the fungus, and it will simply spread it further.
Cannas are also susceptible to certain plant viruses, some of which are Canna specific, meaning they only affect Cannas. These may result in spotted or streaked leaves, if it is a mild case, but it can result in stunted growth, twisted and distorted blooms and foliage if left untreated.
The flowers are sometimes affected by a grey, fuzzy mold called Botrytis. Under humid conditions it is often found growing on the older flowers. Treatment is to simply remove the old flowers, so the mold does not spread to the new flowers.

As you can see they make a very elegant presentation. If you want a tropical look to your yard, plant Cannas with Bananas, Gingers and some cold hardy Palms.
While I was doing some of the research for this article, I came across some rather interesting and unusual uses for Canna lilies and some of the parts of the plant.
For instance:
The seeds are used as the mobile elements of the kayamb, a musical instrument from Reunion, as well as the hosho, a gourd rattle from Zimbabwe, where the seeds are known as "hota" seeds.
Cannas are used to extract many undesirable pollutants in a wetland environment as they have a high tolerance to contaminants.
Smoke from the burning leaves is said to be insecticidal.
And finally, Father's Day is fast approaching....have a gift yet?
In Thailand, Cannas are a traditional gift for Father's Day, just tell your Father you are observing an international celebration this year!
Happy Growing!
Darren
Don't get me wrong, I enjoy some flowers as well as the next person. I also like the more unusual, be it flower or foliage. Today's topic might not be all that unusual, but it can look that way.
Canna or Canna lily, (though not a true lily) is a genus of nineteen species of flowering plants. These plants are close relatives to Gingers and Bananas.
There has been so much hybridization of these plants that most experts just classify them as Canna X generalis. In case you don't read Botaneese (not a real word) that means General Canna. There are hundreds of named cultivars, ranging from less than 30 inches to more than 8 feet in height. If you want color, then these plants are for you. They come in colors from creams and yellows, to oranges and reds, and with a colorful diversity of leaf patterns as well. Cannas bloom from early Summer until frost, if you remove old blossoms regularly so that they do not set seed.
This is what greeted me the other morning. Both of these pictures are from my Bengal Tiger Canna.


Cannas are native to tropical and subtropical regions of the New World, from the Southern United States (Southern South Carolina on West to Southern Texas) and South to Northern Argentina.
They grow from a special modified root structure called a rhizome. A rhizome is the underground part of a horizontal stem of the plant that sends out roots from its nodes, kind of like a tuber, but not exactly.
They are very easy to grow.
They prefer full sun, 6-8 hours. They will however grow in part shade, an area which only receives 4-5 hours of sun. The flowers and foliage may not be as dramatic though.
You will want to feed them every 4 to 6 weeks throughout the growing season with a balanced fertilizer such as a 10-10-10 or a flower booster.
If you have a boggy area of your yard, this might be a plant to consider. Cannas like moist soil and will even thrive in boggy conditions. They can be grown in ordinary garden soils, but will need regular watering.
Listed as growing in Zones 8-12, they can be grown in colder areas, but where the ground freezes, either dig the rhizomes up for the Winter, or protect them with a thick layer of mulch. In cold climates, the rhizomes may be susceptible to rot.
They can be grown in containers, but will need to be divided at least every other year to avoid overcrowding. This is also how they are propagated. Dig up the rhizome, cut it up into a few pieces, making sure there is at least one "eye", kind of like a potato and plant them back again. Plant the rhizomes pieces 2-4 inches deep. Cannas do produce seed, but it is rather difficult to grow them from this means.

There are many named cultivars out there, way too many to mention here, but I am sure there is a color just for you.
'Ace of Spades' - red flowers
'Annjee' - mottled pink and gold flowers
'Camille Bernardin' - salmon over apricot flowers with blue green foliage
'Cleopatra' - orange over yellow flowers, sometimes producing a red petal or complete stem of red flowers
'Garton Baudie' - bright, orange red flowers
'Pfitzer's Confetti' - pale lemon flowers streaked with pink
'Una' - bright lolly pink flowers with gold edging
'Zebra' - red mottled flower
That is just a brief sampling of what you might be able to find.
I mentioned that they are easy to grow. They are also relatively pest free. They do sometimes however, fall victim to the Canna Leaf Roller and the resultant leaf damage. While not fatal to the plant, it does make for a nasty looking one.
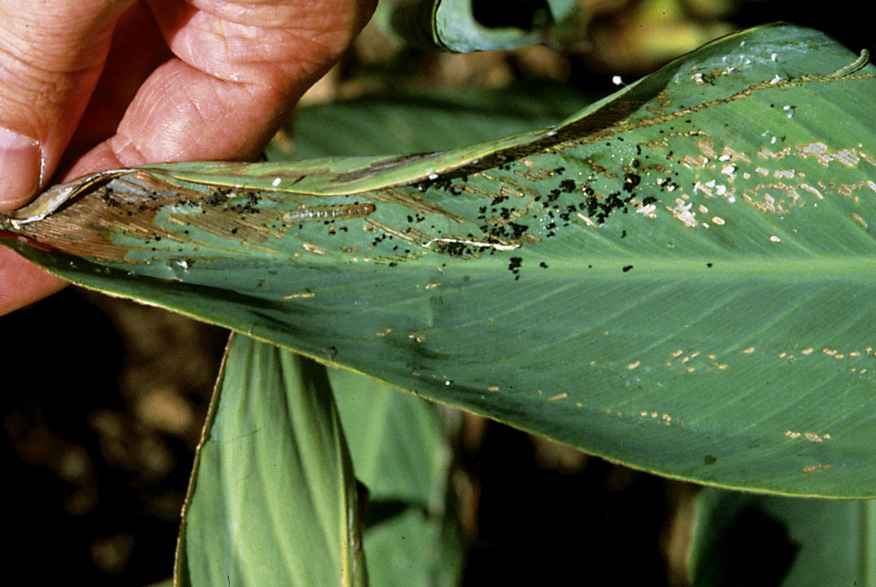
To control, or if there is extensive damage, get some Bacillus thuringiensis or BT.
Any good garden center or nursery will know what it is. Please follow label directions.
Other pests: Slugs and snails are fond of Cannas and can leave large holes in the leaves, preferring the tender young leaves that have not yet unfurled.
Red Spider Mites can also be a problem during a very hot, long Summer.
Japanese beetles can also ravage the leaves if left uncontrolled.
Each of these pests have there own method of control, look on the label for each one specified.
Cannas are remarkably free of disease, compared to many other flowers. However, they can fall victim to Canna Rust, which is a fungal disease caused by Puccinia thaliae. Symptoms include orange spots on the plant's leaves and stems. In advanced stages of infection, the upper leaf surface spots come together, turn dark brown to black and finally, the infected leaves become dry and fall off.

When Canna rust first appears, the affected foliage should be removed and discarded, otherwise the fungi will propagate and destroy the whole plant. The affected foliage should not be composted, because most home compost bins do not get hot enough to kill off the fungus, and it will simply spread it further.
Cannas are also susceptible to certain plant viruses, some of which are Canna specific, meaning they only affect Cannas. These may result in spotted or streaked leaves, if it is a mild case, but it can result in stunted growth, twisted and distorted blooms and foliage if left untreated.
The flowers are sometimes affected by a grey, fuzzy mold called Botrytis. Under humid conditions it is often found growing on the older flowers. Treatment is to simply remove the old flowers, so the mold does not spread to the new flowers.

As you can see they make a very elegant presentation. If you want a tropical look to your yard, plant Cannas with Bananas, Gingers and some cold hardy Palms.
While I was doing some of the research for this article, I came across some rather interesting and unusual uses for Canna lilies and some of the parts of the plant.
For instance:
The seeds are used as the mobile elements of the kayamb, a musical instrument from Reunion, as well as the hosho, a gourd rattle from Zimbabwe, where the seeds are known as "hota" seeds.
Cannas are used to extract many undesirable pollutants in a wetland environment as they have a high tolerance to contaminants.
Smoke from the burning leaves is said to be insecticidal.
And finally, Father's Day is fast approaching....have a gift yet?
In Thailand, Cannas are a traditional gift for Father's Day, just tell your Father you are observing an international celebration this year!
Happy Growing!
Darren
Subscribe to:
Posts (Atom)