Sunday, April 22, 2012

Jeepers a Creeper!!

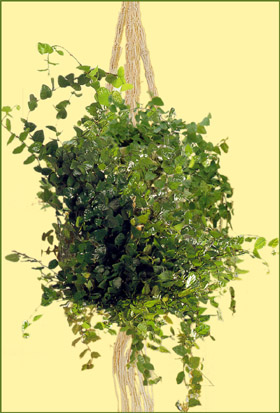
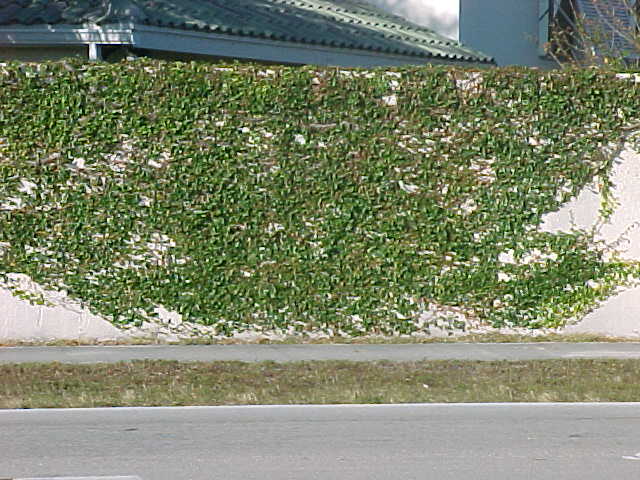
One of the nice things about being a Master Gardener is, I get to work all kinds of events and meet all kinds of people. Sometimes we get really off the wall questions like, "Do I need bees to produce flowers on my Citrus tree?" or they will bring us a plant to identify. I have actually had today's topic asked of me twice in the past dozen or so days, so I thought I might bring it to the forefront. One of the questions was, "Do you know what that plant is growing on the wall in front of Dunes West subdivision?" Luckily, I drive by there rather often and I did know. The other question pertained to the fruit that it produces, but I am getting ahead of myself. That plant on the wall is Ficus pumila, better known as Creeping Fig. It also goes by climbing fig. You have probably seen it a million times and never really paid it any attention.


This is a fast growing, aggressive, but beautiful evergreen vine. It is a relative of the edible fig, Ficus carica, but it looks very little like its cousin. Creeping fig is native to East Asia and is found on Japan's southern islands, eastern China, and Vietnam. If you are looking for a good southern ground cover or want to hide an ugly wall, this is the plant for you. As the common name 'Creeping Fig' indicates, the plant has a creeping/vining habit and is often used in gardens and landscapes. Beware though, it can become invasive and cover structures and landscape features if not maintained in check.


While this may be pretty, you should also know that, when it is climbing on buildings or wooden structures, the woody tendrils can 'Cling' or 'Root in' and damage structures and/or their surface finishes. There has also been cases of top-heavy plants peeling away from the side of houses, it literally peeled the paint right off the wall.
Okay, let's say you have an old brick wall that separates you and your neighbors. It is ugly and you want to hide it, you really want to remove it but that is not an option. Plant some of this stuff. Creeping fig is not particular about soil. It's less aggressive and easier to manage when its grown in less fertile, drier soil. It prefers a little shade, but will do just fine in full sun. When it is young give it a little supplemental water, once it is mature it is very drought tolerant. When young, the leaves are heart-shaped, and small. They get larger, becoming 2-4 inches in length,oblong and leathery when mature. It is rated for Zones 8-11. It will tolerate freezing temperatures for short durations. If you live in a climate where it is too cold in the Winter, it can be propagated by cuttings. Just dust the end with rooting hormone powder, stick it in some potting soil and then place it in a warm, humid environment. Treat it as a houseplant until next Spring.


There is even a Variegated version.


I mentioned at the top of this article that one of the questions pertained to this plant fruiting. It does, but it is a rare occasion. It looks like this.


Apparently there are numerous cultivars and some of the fruit can get very large. In Taiwan, its fruit is turned inside out and dried. The seeds are scraped off and a gel is extracted from their surface with water. It is allowed to set until it forms a jelly known in Taiwan as Aiyu Jelly and in Singapore it is known as Ice Jelly. I am not sure who thought to turn the fruit inside out, dry it and all that other stuff, but I am sure it was somebody really bored. I mean come on, "Hey Dude, lets turn this thing inside out and see what we can do with it". Would YOU know what to do with something that looks like this?!?!


Happy Growing!
Darren

Sunday, April 1, 2012

Blight On!

Hopefully you will already be doing the basics of today's post, but I thought it would be a good idea to tell you WHY you should do it and make sure that you ARE doing it.
It has been a pretty warm Winter, no complaints here, so this could be a bad year for this topic, Camellia Petal Blight.
Here in my Zone 8 Camellias have pretty much petered out, but there are still things to do to alleviate headaches for next year.
Let's start with the basics.
Camellia petal blight is caused by the fungus Ciborinia camelliae. All cultivars of camellias are equally susceptible to this disease. Camellia sasanqua is less so because it's bloom time is in the Fall. This disease only affects the flowers, not the roots, stems or leaves.
The development is favored by frequent rain showers, high humidity, and mild temperatures during bloom. Kind of sounds similar to the Winter we had this year, doesn't it?
Usually the disease is introduced into the landscape on already diseased plants.
The simple scoop is, Camellia petal blight causes blossoms to rot and drop prematurely.


I know what you are thinking, "Flowers rot and drop off after a certain length of time and that is all that this is". And you would be right, except that this happens right after opening and they should stay on the plant for days. Another difference is, the blighted petals are dry and leathery but do not crumble when handled. Petal blight can also be confused with cold injury, but cold injury is usually found on the outer petals, which become dry and crumbly and do not fall from the plant. Flowers from the same plant can have petal blight and cold injury.
The disease is first seen as brown spots on the expanding flower petals. In the early stages of the disease, veins within the spots appear darker than the surrounding tissue, giving some blooms a distinctive netted appearance.
That looks like this:


These spots, which began as small brown specks, enlarge rapidly during warm weather as the fungus invades and kills the flower tissue. A gray or white fuzzy growth may be observed at the base of the flower where it attaches to the stem. (See the base of the flower in the first picture) Eventually the fungus invades to the flower base where a hard, black structure called a sclerotium forms. (Again see the first picture, lower right hand corner) These sclerotia can persist in the soil for several years. Under favorable conditions (cool weather followed by warm, wet weather), the sclerotia germinate to produce tiny mushroom-like structures. The “mushrooms” produce airborne spores that land on nearby camellia flowers, starting a new cycle of disease.
Once introduced it is almost impossible to rid your landscape of this disease. There are things you can do to slow it down. Make sure you don't introduce it to begin with. Check the plant you are buying. If it is flowering, look for the brown specks on the flower. If not, look at the soil and see if you see any of the sclerotium laying there.
If it is has been introduced and you are already dealing with it, watch carefully and collect and destroy all diseased blooms on and beneath the plant.
Each Spring, remove the old mulch. Then spread a layer of about 1 inch of fresh bark, pine straw or whatever your favorite mulch is around the base of each Camellia. The mulch will interfere with the spread of spores to the flower buds. Be sure not to over-mulch the Camellia; burying the root system under 2 or more inches of mulch may kill the plant. Also remember to keep it away from the trunk of the plant to stop other problems from arising.
Along with these sanitation practices, you can apply fungicides. Make sure you read the label and it has Camellia listed. Follow the directions to the letter, this is the law! There are also some soil drench fungicides that can be applied to get any of the spores that may be hiding there.
The fungus may also be spread by the distribution of diseased flowers. This is the reason that at Camellia shows ALL flowers are suppose to be destroyed at the end of the show. You will want to remember not to add camellia petals or leaves to any compost that will be used around Camellias. Most home composts do not get hot enough to kill these sclerotium and you could just be re-infesting your Camellia bed.
Hopefully you have been practicing these types of sanitation tips already. This actually can apply to many kinds of fungus and diseases of plants. If a plant dies and you are not sure why or know that it died due to some illness, better play it safe and burn it or dispose of it in some other manner OTHER than your compost bin.
SO, If you look under your Camellia bushes and you see this:


You might be asking for trouble and end up with this:


Happy Growing!
Darren

Sunday, March 18, 2012

'Tis Seeding Season

Well, the wait is finally, for the most part, over. You have been tormented and teased all Winter long with a constant barrage of seed catalogs. Those beautiful red tomatoes, green peppers, golden corn on the cob and just about every herb that you can think of, and some you may have never heard of. Just sitting there on those full color pages, waiting to be ordered and planted. For many of you the time to plant seeds is NOW! Or at least a few weeks ago, so get a move on. Some are still just getting to that window of planting time. Still others, WAY up North.....well, I think Summer is scheduled to be on a Friday this year, so wait for it.
Joking aside, hopefully you have either already ordered and received your seeds or will be picking some up your next trip to the garden center.
Let's just say for the sake of argument, it is time to plant your precious seeds, and you want to get this thing in gear.
How?
I am going to assume you know what you want to plant, peppers, tomatoes, okra, basil, whatever. The next thing you need to figure out is, what do you want to start them in?
This is going to be more of a financial decision. You can go out and get the peat pots, peat pellets and the like. More on these later. Depending on how many plants you are planning on starting, this could get pricey. Let's just say you are cheap like me, read also poor into that. I like to start my seeds in whatever I happen to have available. Luckily, I have a wonderful wife who gets me those mini greenhouse sets when they go on sale. Side note, these can make GREAT Christmas, Birthday, Anniversary gifts....I am just saying. If I do not happen to have anymore of the mini sets, I tend to improvise.
Three inch plastic pots are a perfect size to start seeds. They don't dry out as quickly, they are of a manageable size and still have enough room for the roots to get a strong start.
Clay pots will work, but they tend to dry out too fast.
Milk Containers. Any size will work. Just make sure you punch holes in the bottom to allow for drainage.
Margarine and Cottage cheese containers. Again, make sure there are holes in the bottom for drainage.
You may even remember a science project from school, using egg cartons. Being that these are rather small, you may want to transplant at least once into a little larger pot before planting outdoors, just to get a little larger root system going.
And of course, peat pots.


These can be planted directly into the ground once the seedlings are good and strong. One piece of advice here though, make sure that no part of the pot is sticking out of the ground when you plant it. It acts as a wick and will dry out your seedling very quickly. To encourage roots to spread out into the garden soil, you will also want to carefully cut or tear holes in the bottoms of these pots, because they usually don't break down completely in the soil, and may inhibit root growth.
These are just a few examples, I am sure your imagination can come up with lots more.
Okay, you got what container you want to use, now you need some kind of stuff to put in the container to plant the seed.
The medium used for starting seeds should be loose, well-drained, and of fine texture. You may use commercially prepared mixes or you may mix materials yourself.
Let's start with an easy and clean way.
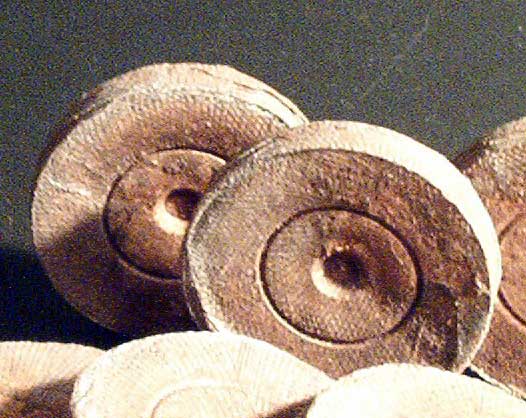
Compressed peat pellets. When dry, expandable peat pellets are about the size of a silver dollar, but somewhat thicker. When placed in water, they swell to form a cylindrical container filled with peat moss, ready for seeding or transplanting.


These may also be planted directly into the garden. Use the pellets in trays so they are easily watered and held upright. Be sure they are placed so the open side is up. A word of caution here. Hopefully you are aware that seeds and seedlings should not be allowed to dry out completely, they will die. Should the peat pellets get forgotten and dry out, it is VERY hard to re-wet them.
I have not tried this one personally, but I may have to one day.
Vermiculite. This material when used alone provides good seed germination. It is clean, and if not contaminated during handling, will not need sterilization. If other seeding mixes are used, it is useful for covering seeds. It does not form a crust, and seedlings can easily emerge.
Soilless mixtures. Mixes that contain no soil are available for growing seeds. These contain either a combination of peat moss and vermiculite or peat moss and perlite. Get the best stuff you can afford, there are some really cheap ones and the money you save here may cost you dearly in germination.
Now comes the hard part, you have the seeds, the containers and the soil medium, now what?
Fill the containers with the medium and stick the seed in, right? Not so fast. How deep should the seed be planted? I would venture a guess that millions and millions of seeds have been lost to rot because they were planted too deep. Trust me on this one, I probably have lost half that number.
The general rule of thumb is, twice to three times as deep as they are wide. I have come to the conclusion that I say "HUH"? to that general rule of thumb. Have you ever seen a lettuce seed? If you have bad eyesight, probably not.
I use this theory and my germination rates have improved 100 fold.
Small seeds, lettuce and such, are best planted by scattering them thinly over the surface of the soil and then patting them down. I usually water with a fine sprinkle and that helps set them in also.
Medium-sized seeds might include things like radishes, peas and beets. These are easier to see and can be planted their own width deep into the soil. Pat the soil down to firm it around the seed. Again, water them in.
If you are planting a large seed, maybe something like an almond or something like that, plant them as deep as they are long. Water in.
Experience will tell you that something is wrong. If you have planted 100 seeds and 3 have come up, you probably are too deep. There is a chance that you have old or expired seeds. If you are not sure, plant some more, but plant a little higher this time and see what happens.
You will want to place some kind of covering over the container. The seeds need warmth, humidity, moisture and a few things will need light to germinate. Do not place covered containers in direct sunlight. It will get way too hot and it will cook the seeds. Remember I told you about the mini greenhouse, they look like this:


Watch daily for germination. Move them to more direct light, and remove plastic or glass coverings as soon as germination is well underway, usually when you see the first set of true leaves. The first leaves to appear when the small plant breaks the surface of the soil are not true leaves, they are cotyledons or seed leaves. These are filled with starch and other things the plant needs at the beginning of life.
This will also be the time to thin your young seedlings. As difficult as it is, if you planted two or three seeds in a hole, some of them will have to go. They will just compete with each other and in the end make for a weak plant.
When it is time to transplant the seedlings into their new home, care should be taken. Lift seedlings by the rootball, using a spoon or plant tag for support if necessary. Never hold the seedling by its stem, as you may crush it. If you feel the need to steady the plant from above lightly hold the plant by a leaf. A seedling that has lost a leaf can grow another, but a seedling that has lost its stem cannot survive.
One problem I seem to always encounter is sunburn of my plants. I get so eager to get these things growing that I push the timetable.


Plants which have been growing indoors cannot be planted abruptly into the garden without danger of injury. To prevent damage, they should be hardened off before planting outdoors. Ideally, about two weeks before planting outdoors, start hardening off the seedlings by moving them outside for increasingly longer periods each day. Start by putting them outside for a few hours in the shade during the warmth of the afternoon. Choose a spot protected from wind. Bring them back inside for the night before temperatures start to drop. Each day, leave the plants out a little longer, and expose them to a little more direct sunshine. By the end of two weeks, unless freezing temperatures are forecast, the seedlings can stay outside in a sunny area until you are ready to transplant them into the garden.
Starting seeds has so many pros to it. They are much cheaper to buy than plant starts. You can get a much wider variety of things to grow, the big box stores can only carry just so many varieties of already grown plants. The satisfaction you will get knowing that you started a plant that has pounds of something edible on it from a seed is immeasurable. It is also a great way to get your kids involved in something wholesome.
I will leave you today with one other tidbit of useful information. My mother will surely think this is aimed at her, and to a large degree it is, TAG YOUR PLANTS!!
I promise you, even if you only plant one kind of pepper or one kind of tomato, you will forget what the name of it is. I hear my mother now, "but I know that it is a pepper or a tomato, why do I need to know what it's name is?"
For everybody else in the world, you will want to know what the name of it is so if it does not grow well for you, it does not get planted again next year.
Happy Growing!
Darren
Saturday, March 3, 2012

Puncturing Post

I got a phone call from my Clemson Extension agent this past week. She had a client in the office with a Meyer Lemon problem. She could not have called at a better time. She wanted to know if I could receive pictures on my phone, which I can't, or if I happen to be close to my computer? I was actually in the process of sending out some e-mails, so I was right there.
Both she and the client thought maybe that the problem was some kind of an overspray of chemicals by both the homeowner and landscaper. Luckily this was not the case, it was much more benign that that.
The tree was actually hurting itself. If you have ever grown Citrus you know that many of them have thorns.....Kind of like this:


Pretty evil looking huh?
Well, what was happening was, every time the wind started to blow it would knock the fruit against these thorns. As you can see, they are very sharp. The resulting damage will then look like this:


and this:


For the most part, this is just a cosmetic damage. If you are planning on eating the fruit in a short period of time, there should be no problem. The interior is usually unaffected.
However, if you are planning on storing your fruit for any length of time or want to ship it to a friend, this is where there could be problems. Those little puncture wounds, numerous in many cases, are entry points for an array of bacteria and fungi.
Let's check a few of these out.
We will start with the most colorful, Green and Blue Molds.
Green mold, the most important of these two post-harvest diseases, is caused by the fungus Penicillium digitatum. A rapid breakdown occurs in fruit punctured or bruised during harvesting and packing operations. The fungus enters the fruit through wounds. Therefore, the disease can occur on fruit on the tree, in the packinghouse, in transit, in storage and in the marketplace. A white mold is first seen growing on the peel. The mold later turns green because of the large number of green spores produced. Decayed fruit becomes soft and shrinks.
Blue mold, Penicillium italicum is less common than green mold, but the blue mold grows faster. Both infections develop in damaged areas in the rind.
If you see something along these lines, then you know there was probably some kind of damage:


I think this was a science project from my 5th grade class, if not it should have been.

Another post harvest problem can be, Diplodia Fruit rot caused by the fungus Diplodia natalensis. This infection occurs most frequently at the stem end of the fruit but occasionally can occur via injuries on the side of the fruit. The fungus grows rapidly through the spongy central axis of the fruit. It grows unevenly through the rind, which produces finger-like projections of brown tissue on the infected fruit.

Photo courtesy of visualsunlimited

So as you can see damaged Citrus peel can be a nasty problem. There are a couple of easy ways to fix it.
You can snip off those thorns with a pair of toenail clippers. I know this sounds like a long and tedious task, and it is, but the fruit will thank you and anything else that happens to bump up against the tree will thank you. You do not necessarily need to do the entire tree, just where there is fruit.
Thinning the branches of the tree to open it up more is something else that can be done. This is actually a good suggestion anyway, it allows more airflow into the tree which will cut down on the possibility of other diseases.
You can plant buffers by your Citrus trees to help cut down on the wind or plant them in non windy areas. Shielding your trees from the wind is probably the easiest to do. Yes, you can cut off the thorns, but small stubby branches can do the same kind of damage.
Something that many people don't think of when harvesting Citrus. You really should snip the fruit from the tree instead of pulling. This can lead to a problem of the peel leaving a little button on the tree and the fruit is then susceptible to all of those nasty problems I mentioned above.
I should mention one other puncturing type of problem. This one also happens semi-frequently and there not many ways to stop it from happening.....our feathered friends can become a nuisance. I actually watched a Mocking Bird do this before I could scare him off.


Thankfully this was just a one time attack and I have not had a problem since. Maybe he didn't like it, or maybe me yelling at him like an old man yelling at a bunch of kids in his yard did it.
So, in a nutshell, protecting your harvest should be your number one priority. You have fed, watered, pampered and protected your tree to get some glorious fruit...wouldn't it be a shame if a gust of wind ruined all those months of hard work?
Happy Growing!
Darren

Monday, February 13, 2012

A Cut Above the Zest

As the temperatures start to warm, there is a phenomenon that seems to grip many of my fellow gardeners. It is also one that scares many of them at the same time.
The dreaded Pruning of Citrus Trees.
I have had numerous e-mails and phone calls as to when you should prune them, how to prune them, do I think it is needed, etc. I know you should not answer a question with a question, but I usually just have one. Why do you want to prune it?
Citrus trees do not usually need regular pruning to remain productive and they are usually allowed to develop on their own. They have an attractive hemispherical shape, without the help of man. Besides, when you are cutting off branches,doesn't that mean you are cutting off flowers, which is cutting off fruit?
The basic definition of pruning is: The cutting off of plant parts in order to develop a certain shape, and to remove dead, diseased or badly placed branches.
Let's start with the easy ones.
Dead or Diseased branches. This is kind of a no brainer. If the limb or branch is dead, why leave it on there? It is taking up space, looks ugly and isn't doing anything anyway. So get it out of there. As for diseased branches, again, no brainer. It more than likely is not producing good fruit, if at all. Probably has wilted leaves or just doesn't look good and, it is harboring a disease that could and will infect the rest of the tree.
A good candidate for pruning might look something like this:


I would make sure that there was not some other underlying problem here. The leaves may have been eaten off by an insect or something else. Check it for life and disease before just hacking away.
Along these same lines, you will want to look for branches that are crisscrossing each other. Cut the weaker looking one out. The theory behind this is, the branches will rub together in the wind, rubbing the bark off and allowing a perfect access point for insects and diseases.
I mentioned badly placed branches. This is where proper plant in proper place can come into affect. Citrus trees lend themselves to be "limbed up". That is, basically made to look like a tree. It is much harder to get to the fruit that way, but it can be done. So if you want it to be next to a sidewalk or driveway, no problem. Badly placed branches would include, too close to the house, interfering with a power line, or maybe blocking a view. In these cases, you would want to cut out the offending branches. The tree might look lopsided unless you did the same thing all the way around.
With all this being said, they do use large machines to prune Citrus trees in commercial groves on a regular basis. The reason being is more of a safety and financial situation. It is much easier to reach the fruit on a shorter tree. Yes, I know, the same can be said for the homeowner. I can argue both sides of this one. You might only have to climb up and down a ladder on say three trees, imagine having to climb a ladder up and down on 500 trees?
One other thing before we move on here,Citrus trees can also be sheared regularly as a hedge or trained as an espalier and still produce some fruit. As you can imagine, it will diminish the size of the crop if you go this route.


Okay, that is more for the aesthetic reasons for pruning. What about after a really hard Winter or freeze event? While it might be a great temptation to cut off frozen or apparently dead branches, the time to prune that unsightly mess is after the first flush of Spring. Researchers in Florida have found that trees pruned after the first flush of growth recovered more quickly and grew more vigorously than those pruned right after the freeze. Often what will happen is, the leaves on freeze damaged limbs may grow but then will soon wilt. If you wait until after the Spring flush, you will have a better idea of just how much you need to prune off.
There is one more situation of pruning that I would like to bring up, it involves the rootstock. Many Citrus trees are grafted onto a different type of Citrus tree than what the fruit is. An example might be a Navel Orange is grafted onto a Sour Orange root system. There are many reasons why this is done and that would make for a good blog sometime in the future, for now, just follow me on this.
While the top part or Scion is growing, the rootstock or root system is mad because they wanted to continue to grow too, so, they send up new little suckers. Many times they look like this:


Photo courtesy of Farmer Fred Rant Blog

You can clearly see where the graft is, the dog leg like growth. The rootstock is sending up new shoots from beneath the graft line. You will want to stay vigilant and cut these off whenever you see them. There are a few reason. First, they are draining energy from the tree itself. Second, you can allow them to grow, but it will make for an ugly, bunched up tree. Third, when they do produce fruit, more than likely you will not want to eat it. There is a good chance that it will be a Poncirus species and the fruit of that type is....well, let's just say, unless you enjoy the taste of kerosene, you will not want to eat it. The running joke is, it tastes like you are being poisoned, but you are not.
I kind of eluded to the best time to prune earlier. Basically, after the danger of freezing temperatures is past and just after the Spring flush for freeze damage. If you are doing it for looks or bad placement, you will want to do it before the initial flush of growth. If there is any doubt as to whether there is freeze damage or not, then just wait until after the flush.....either way you are NOT going to harm the tree, unless you do like my Grandfather always did. He would start by just taking a little off something he was pruning and before long was at soil level.
The question often arises during this time, "I have this one really vigorous shoot that is coming out of the top of the tree, can I cut it off?" This often creates an unkempt, out of balance appearance. These can be cut off with no ill affects.
There are probably other reasons that a Citrus tree might need to be pruned that I have not encountered or thought of. If you have such a reason and need some advice, please let me know,I will help you as much as I can and I can pass the solution on to others that might have the same situation.
I would be totally remiss if I did not leave you with a little bit of a safety precaution. Before you prune any of your Citrus trees, you might want to invest in some nice thick gloves, a long sleeved shirt and some protective glasses. You might also want to consider a hard hat. Some of these things have some really sharp thorns and getting skewered by one is a painful experience you will not soon forget!!


Happy Growing!
Darren

Sunday, January 22, 2012

Attacked by the Natives!!

I am NOT a fan of Native Plants! There I said it. I think for the most part they are ugly and look like weeds. Now, before my friends from the Native Plant Society hang me from the nearest Betula nigra (River Birch), let me say this....I understand their point of view, kind of.
Yes, I will admit that Native Plants have a use in the landscape. They tolerate our up and down temperatures. They know how to handle the droughts we sometimes have. They also provide shelter and in some cases food for the local indigenous critters. There are even a few decent looking plants. I like the majority of the trees, Oaks, Maples and such.
However, What does this look like to you?


To me it looks like a yard that has been unattended to for years. I know, there are some people that find this pretty. There are also people that think Justin Beiber is talented, but I digress.
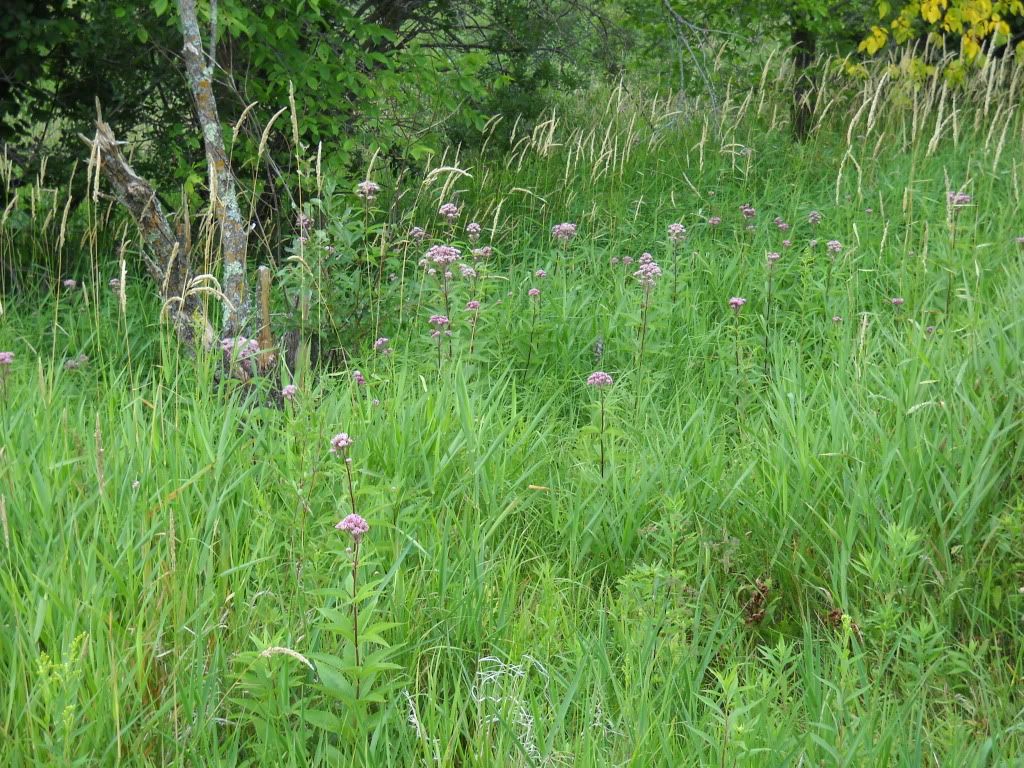
How is this for pretty?


Looks like somebody needs to mow. This is Eupatorium fistulosum, also known as Joe-Pye Weed. With a name like that, who wouldn't want it in their yard!?
There are entire neighborhoods that are planting almost strictly native plants.
While I admit, this is a little formal for my taste, isn't this much prettier?


Okay, you want some reasons why you should plant natives? When used intelligently, native plants require less maintenance, are less expensive, and save energy. Did you know that lawnmowers are a significant source of air pollution? Lets, just for the sake of argument say this is true. Well then,lets just all stop mowing our yards. Problem solved!
Used properly, native plants require little to no extra water or fertilizer compared to most exotics. This is sounding like the lazy mans landscape solution.
Native plants have been exposed to most pests as long as they have existed, and continue to display their resistance to insects and disease in our own yards. So what do the bugs eat, each other? They need to survive too.
This is an excerpt from a Native Plant Societies newsletter down in Florida:
With historical perspective, this is an amazing development. In past centuries, when corners of this planet were yet unexplored, botanists brought horticultural oddities from hither and yon to beautify the gardens of the elite. To adorn one's garden with plant species that were foreign, rare and unusual was a mark of wealth and status. Only the leisure class who studied botany and horticulture could identify and appreciate these collections. Today, by contrast, exotic plants are no longer the exception but the rule; everyone has them, regardless of their socioeconomic standing. It is the inclusion of native species in one's garden that is now distinctive and unusual, and ironically, only those with a special interest in native plants can identify and appreciate these native collections.
If you want something really strange and unusual in your garden, go native!
I would like to disagree with that last sentence. I have growing in my yard some very unusual plants that NOBODY else in this area is growing. My variegated Chinaberry is very unusual and it is definitely NOT native....Chinaberry? Hello.
If it were not for the exotics coming into this country, we would be in some financial hardships....okay, even more than we are now. How much do you think it would cost to import Orange Juice from China instead of Florida? Citrus is native to our Asian friends.
Another example would be that PB&J you gave your kids for lunch. Do you think Peanuts are native to North America? Nope! The peanut is native to South America.
So leave my exotic plants alone and I will try and tolerate your Native Plant fetish.
For those of you that don't quite get this article, it is mostly tongue in cheek.
On a serious note, look into some native plants for your area. Everything is native to somewhere. While I admit, I do not like most native plants for my area, they can and do have their place in the landscape. Besides, I have a lot of Master Gardener friends that love their natives and will probably want to boil me in Witch Hazel after they read this. It is a native you know!
Happy Growing!
Darren

Sunday, January 8, 2012

Jump Start on Spring

Now that the holidays are over, it is time to start thinking Spring!!
So far the Winter here in my zone 8 has actually not been too terribly bad, of course with that being said, I will be buried in 8 feet of snow next week. Knock on wood.
So, I was actually trying to come up with a idea for a good blog this week and was not having the best of luck. Yesterday, one of my best friends, Paul called me. He wanted to know if I had ever heard of a "Hotbed". I asked how he meant it, because I knew of a couple of meanings. He then told me that he had two glass shower doors and his mother wanted to build a hotbed to start some vegetable seeds. He offered one of them to me, but with my greenhouse and limited space, I declined the offer.
After that conversation I got wondering just how many people have even thought of doing something like this. There are so many benefits. You can recycle the doors and possibly other materials. You get a jump start on Spring and veggie growing. It can be a fun family activity. I really saw no downside. I also wondered how many people even knew what a "Hotbed" or "Cold Frame" even was and if they knew how to build one.
Success, a blog article!
Cold frames (or hotbeds) are simple structures that have two main purposes. They act like miniature greenhouses to trap radiant heat and to provide protection and insulation from the elements.
They can be very elaborate or very simple, depending on the expertise of the builder and what you have on hand or are willing to pay for materials. You can even purchase a pre-made one. This is an excellent example of the basics we are striving for.


Even though they can be simple or elaborate, there are a few certain basics that need to be observed.
First thing to consider is the location. Ideally it should be South facing to collect the warmth of the sun. A West facing direction would be second best. When I say facing a certain direction, the sloped front should face South or West. The sloping will of course give you better sun exposure, but it is not so critical that all is lost if you don't have it.
Most cold frames are a simple rectangular wooden box, about 2-3 ft high that sits on the soil surface. If you have access to straw bales, maybe something left over from the Fall holidays, you can use them too. That would look something like this.


Other materials to consider are brick, masonry, cinder, and concrete blocks. Use your imagination. If you really want to get fancy, foamboard insulation panels can be used inside the frame on the above-ground, North-facing side for even more insulation.
Good drainage is essential for the plants, especially if you are planting directly in the ground and plan on moving the cold frame later. If you are using this to harden off or start seedlings in containers, just make sure that the containers can drain. An accessible water supply is also very important. The top covering will prevent rain from watering your plants, so that must be done manually.
Okay, you have decided what you want to build the walls out of. Before you begin building, you need to decide what the top will be made out of. Follow me for a second here.
Many different materials, both recycled and new can be used for the frames lid. These include such options as glass, fiberglass, or poly (plastic) film.
Double glazed windows are a good choice. They are durable and are heavier than other materials. Glass is generally looked upon as the best material to cover a cold frame. Other materials include discarded storm windows from screen doors or no longer needed patio doors or the above mentioned bathroom shower doors like my friend has.
If polyethylene plastic is used, the film should be clear and at least 6 mil thick. Consider using a double layer for extra insulation. The poly is not very durable and will probably have to be replaced each year.
Now, why did I say that you need to decide on the top covering before building the box? If you have a shower door that is 7 feet long and you build a box 8 feet long, how effective do you think the whole thing will be?
Get the measurements of your top first, then build your box.
There are some pros and cons to the different materials used for the top.
If you use glass:
PROS:
*Recycled windows can be used.
*Good light transmission.
*Good insulation value.
*More hail-proof (weatherproof) than polyethylene.
CONS:
*Glass is heavy. The extra weight means the frame must be able to withstand the extra weight.
*Opening and closing involves additional weight.
*Broken glass is more difficult to replace and repair.
*Expensive to purchase new.
If you use plastic:
PROS:
*Inexpensive to purchase.
*Easy to install and lightweight to handle.
CONS:
*Probably will need to be replaced each year
*Won’t withstand large hail stones, heavy snow, ice loads or errant twigs.
*Must be secured so that it doesn’t take off in a strong wind.
There are other materials that can be used, again each one will have its pros and cons.

I am by no means a carpenter, that is my brothers gig. That sucker could put McGyver to shame. So, I am not going to give you building tips or dimensions or anything like that. Besides, I have no idea what size shower door or glass windows you are going to use.
I will give you some ideas on how to use your new built toy.
You can start the Spring cool weather vegetables — Lettuce, Onions, Spinach, Radishes, etc. — up to 45 days before you experience your last frost. While excellent for starting your Spring vegetables, a cold frame is NOT the best place to start warm-weather vegetables such as Tomato or Pepper plants. The average temperature may not be consistently warm enough to germinate those seeds. What you can do is, long before Spring arrives, start the plants indoors under grow lights and then move them out to the cold frame to help harden them off. This eliminates a lot of the transplant shock.
And lastly, don’t forget that you can use a deep cold frame in the Fall if you wish to extend the growing season of the same vegetables.
There is one more very important factor that I should tell you about. Even in the middle of Winter, there will be very sunny days. The temperature in your box, under glass could get very hot. If you are doing the cool season crops, Lettuce, Cabbage and such, they will not be happy. Whatever type of covering you decide on needs to be hinged in some fashion. This way when the temperature gets too hot, you can prop it open, like this.


Remember to take into account wind speed and direction. You don't want the lid flying off or the interior temperature to cool down too fast. This prop job is extreme, sometimes only a couple of inches will suffice.
I really appreciated my friend thinking of me and offering the shower door. Like I mentioned above, I have my greenhouse and just not enough room to do something cool like this. I wish him and all of you the best of luck this growing season, may your lettuce produce large leaves and your zucchini produce an abundant crop. Beware that last wish, I have heard evil stories of such bountiful crops of zucchini that people were locking their car doors at church in fear that a fellow gardener would leave a present of their "OVER BOUNTIFUL" zucchini on the driver seat!
Happy Growing!
Darren