I had never heard of National Ag Day until I received my latest Florida Grower E-mail today. Apparently this sounds like a fun thing and VERY educational. SO,being that one of my goals for this Blog and being a Master Gardener is education, I thought I would spend some time on it today.
What is it? It's a day to recognize and celebrate the abundance provided by agriculture. Every year, producers, agricultural associations, corporations, universities, government agencies and countless others across America join together to recognize the contributions of agriculture.
Here are just some of the key reasons why it's important to recognize - and celebrate - Ag Day each year:
The National Ag Day program believes that every American should:
1) Understand how food, fiber and renewable resource products are
produced.
2) Value the essential role of agriculture in maintaining a strong
economy.
3) Appreciate the role agriculture plays in providing safe, abundant
and affordable products.
4) Acknowledge and consider career opportunities in the
agriculture, food, fiber and renewable resource industries.
Increased knowledge of agriculture and nutrition allows individuals to make informed personal choices about diet and health.
Agriculture provides almost everything we eat, use and wear on a daily basis. But too few people truly understand this contribution. This is particularly the case in our schools, where students may only be exposed to agriculture if they enroll in related vocational training. If you want proof of this, ask a school age child some easy questions:
1) Where does Milk come from? I bet you will get all kinds of crazy answers like, "The grocery store" "My mother brings it home" or "The container in the refrigerator".
OR
2) Where do Peanuts grow? I guarantee there will be at least one that says "On Trees".
OR
3) If you really want to have some fun, ask them what paper is made of? The blank stares you will get say volumes!
Agriculture is extremely important to this country. Here are some of the interesting facts I found:
* Agriculture is America's #1 export.
* U.S. farmers and ranchers produce more than 200 raw commodities yearly for domestic and export markets.
* One farmer produces enough food to feed about 144 people in the United States and abroad compared with just 25.8 people in 1960.
* Agriculture generates 20% of the U.S. Gross Domestic Product.
* One-fourth of the world's beef and nearly one-fifth of the world's grain, milk and eggs are produced in the U.S.
If you would like to learn more about National Ag day, go to: http://www.agday.org/
I encourage you to find an event in your area on March 20th. If you can't find one, maybe just pause for a moment or two to think about all the wonderful things that Agriculture does for you on a daily basis. Things such as, the cotton in the clothes you wear. The food you eat. The lumber in the house you live in. The list is very extensive. If you happen to come face to face with a farmer, shake his (or her) hand and tell them Thank You!
Happy Growing!
Darren
Tuesday, March 16, 2010


Monday, March 15, 2010
It's About Bloomin' Time!
I wanted to give you a little inspiration today. Spring is finally really starting to show it's head. So, I wanted to share a few Camellias that are blooming in my yard right now. They are all in containers, in case you were wondering.

Camellia japonica 'Something Beautiful'

Camellia japonica 'Mathotiana'

Camellia japonica 'Nuccios Gem'

Camellia japonica 'Mathotiana Variegated'

Camellia japonica 'Betty Sheffield'

Camellia japonica 'Dubonnet'

Camellia non-reticulata hybrid 'Taylors Perfection'
These are just some of the Camellias that are blooming right now. I have really gotten into growing them. Currently my collection stands at 19 named varieties. I have a couple that I am still trying to identify.
I hope this gives you some inspiration for the coming season, it does me every time I walk out my front door!
Happy Growing!
Darren

Camellia japonica 'Something Beautiful'

Camellia japonica 'Mathotiana'

Camellia japonica 'Nuccios Gem'

Camellia japonica 'Mathotiana Variegated'

Camellia japonica 'Betty Sheffield'

Camellia japonica 'Dubonnet'

Camellia non-reticulata hybrid 'Taylors Perfection'
These are just some of the Camellias that are blooming right now. I have really gotten into growing them. Currently my collection stands at 19 named varieties. I have a couple that I am still trying to identify.
I hope this gives you some inspiration for the coming season, it does me every time I walk out my front door!
Happy Growing!
Darren
Sunday, March 14, 2010
Quit Bugging Me!!
According to research, there are more than one million insect species that have been identified, and nearly 100,000 live in North America. Lucky us! I swear I have at least one of everything in my yard!! However, only a few damage landscape plants. The most common plant pests are aphids, mealybugs, scales, whiteflies, thrips, spider mites, and caterpillars. All of which I am sure you have dealt with at one time or another.
Aphids, mealybugs, scales, and whiteflies have needle-like mouthparts to pierce plant tissues and feed on plant sap. Literally sucking the life out of your plant. It is common for foliage infested with these insects to be covered with black sooty mold. The reason for this is because they secrete a sugary product known as honeydew. Sooty mold indicates pests are present. Ants are also a good indicator of the presence of insects. They feed on honeydew, and often care for and protect the insects that produce it.
I did a lecture at the Carolina Yard Experience on Integrated Pest Management, also known as "The Good, The Bad, and The Ugly". The gist of my lecture was, Allow the beneficial insects to do their work. Ladybugs and lacewings are common predators that feed on piercing-sucking plant pests. If you don't use a lot of broad-based insecticides these GOOD insects will help control the other BAD insects.
I touched on a few bad insects there and I will do so here.
Aphids:
 Courtesy of University of California
Aphids may be winged or wingless. They have pear-shaped bodies. They are usually green but may be yellow, black, red or other colors. Aphids attack succulent young leaves, and they typically congregate on the undersides of growth. You will know that you have an aphid problem when you see leaves becoming twisted or distorted, lots of ants and sooty mold. To help control them and give your good bugs a little help, Fertilize and water moderately to avoid excessive new growth. Flush aphids from branch tips with a garden hose. Insecticidal soaps do little damage to aphid enemies. A few aphids should be tolerated because they are a good food source for beneficial insects. Think of it as leaving a little snack for your friends.
Mealybugs:

Mealybugs are small insects that have soft bodies and well-developed legs. Their bodies are covered by a powdery, white, wax coating that may also surround their egg masses. They attack leaves, twigs, and roots. Mealies are usually pretty easy to spot, but if you see white waxy deposits, sooty mold on foliage, and lots of ants there is a good chance you have them. To control them, Horticultural oil and insecticidal soaps may be applied as a spray. Again, these will be less toxic to your beneficial friends. Control can be difficult, however, because mealybugs like to hide in tight, hard-to-reach places and protect themselves with wax deposits.
Whiteflies:

Adults appear as white specks on plants. They deposit lots of eggs on the underside of leaves. Stationary larvae are oval, flat, transparent to greenish in color when they are alive, and dull white when dead. You know you have Whitefly when you brush up against the plant and it looks like an upward bound snowstorm. The top sides of the leaves become pale or spotted. You have lots of Ants and sooty mold. Some whiteflies have developed tolerance to pesticides. Insecticidal soaps and horticultural oils are effective and of course, environmentally friendly. There is another environmentally safe way to control Whitefly, yellow boards smeared with oil will trap many of these insects.
Spider mites:

Spider Mites are tiny, have oval bodies and are about the size of this period. They may be red, yellow, greenish or spotted. Adults spin loose webs on foliage and reproduce rapidly in hot weather. The Injury they do looks like light-colored dots, which gives leaves a dull, gray-green, stippled appearance, fine, loose spider webs and ashy looking residues. You will need a magnifying glass to see these tiny little insects. These guys are difficult to get rid of because mites multiply quickly, they develop pesticide tolerance when the same product is used over and over again. Alternate horticultural oil with insecticidal soap. Use a garden hose to dislodge mites from plants. If you must use a chemical, make sure it is labeled for Spider Mites or arachnids.
As always, make sure you follow label directions!! I can not emphasize this enough, it is the law!
Hopefully, this will give you some idea of what to look for and what to do for them. I didn't get to lecture in front of very many people, but I sure talked to a
Happy Growing!
Darren
Aphids, mealybugs, scales, and whiteflies have needle-like mouthparts to pierce plant tissues and feed on plant sap. Literally sucking the life out of your plant. It is common for foliage infested with these insects to be covered with black sooty mold. The reason for this is because they secrete a sugary product known as honeydew. Sooty mold indicates pests are present. Ants are also a good indicator of the presence of insects. They feed on honeydew, and often care for and protect the insects that produce it.
I did a lecture at the Carolina Yard Experience on Integrated Pest Management, also known as "The Good, The Bad, and The Ugly". The gist of my lecture was, Allow the beneficial insects to do their work. Ladybugs and lacewings are common predators that feed on piercing-sucking plant pests. If you don't use a lot of broad-based insecticides these GOOD insects will help control the other BAD insects.
I touched on a few bad insects there and I will do so here.
Aphids:
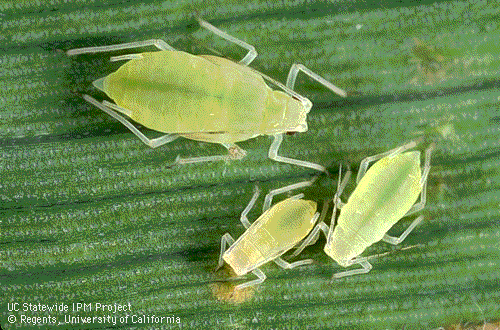 Courtesy of University of California
Aphids may be winged or wingless. They have pear-shaped bodies. They are usually green but may be yellow, black, red or other colors. Aphids attack succulent young leaves, and they typically congregate on the undersides of growth. You will know that you have an aphid problem when you see leaves becoming twisted or distorted, lots of ants and sooty mold. To help control them and give your good bugs a little help, Fertilize and water moderately to avoid excessive new growth. Flush aphids from branch tips with a garden hose. Insecticidal soaps do little damage to aphid enemies. A few aphids should be tolerated because they are a good food source for beneficial insects. Think of it as leaving a little snack for your friends.
Mealybugs:

Mealybugs are small insects that have soft bodies and well-developed legs. Their bodies are covered by a powdery, white, wax coating that may also surround their egg masses. They attack leaves, twigs, and roots. Mealies are usually pretty easy to spot, but if you see white waxy deposits, sooty mold on foliage, and lots of ants there is a good chance you have them. To control them, Horticultural oil and insecticidal soaps may be applied as a spray. Again, these will be less toxic to your beneficial friends. Control can be difficult, however, because mealybugs like to hide in tight, hard-to-reach places and protect themselves with wax deposits.
Whiteflies:

Adults appear as white specks on plants. They deposit lots of eggs on the underside of leaves. Stationary larvae are oval, flat, transparent to greenish in color when they are alive, and dull white when dead. You know you have Whitefly when you brush up against the plant and it looks like an upward bound snowstorm. The top sides of the leaves become pale or spotted. You have lots of Ants and sooty mold. Some whiteflies have developed tolerance to pesticides. Insecticidal soaps and horticultural oils are effective and of course, environmentally friendly. There is another environmentally safe way to control Whitefly, yellow boards smeared with oil will trap many of these insects.
Spider mites:

Spider Mites are tiny, have oval bodies and are about the size of this period. They may be red, yellow, greenish or spotted. Adults spin loose webs on foliage and reproduce rapidly in hot weather. The Injury they do looks like light-colored dots, which gives leaves a dull, gray-green, stippled appearance, fine, loose spider webs and ashy looking residues. You will need a magnifying glass to see these tiny little insects. These guys are difficult to get rid of because mites multiply quickly, they develop pesticide tolerance when the same product is used over and over again. Alternate horticultural oil with insecticidal soap. Use a garden hose to dislodge mites from plants. If you must use a chemical, make sure it is labeled for Spider Mites or arachnids.
As always, make sure you follow label directions!! I can not emphasize this enough, it is the law!
Hopefully, this will give you some idea of what to look for and what to do for them. I didn't get to lecture in front of very many people, but I sure talked to a
Happy Growing!
Darren
Saturday, March 13, 2010
A Deep Seeded Question
Well, just got home from the Carolina Yard Experience. It was a long day, but definitely a success. There was 572 people came through the gate for gardening and other yard information. I talked to many good folks, gave a couple of good lectures and demonstrated how to make permanent plant tags out of aluminum cans (see Tag Your It on this blog site).
I had one woman come up to me and ask about starting seeds. She had planted some 5 weeks ago and nothing came up. Also repeated the process two weeks ago with the same result. I was puzzled. Surely SOMETHING had to come up, even with very old seeds. She assured me they were fresh, she had just bought them. She was giving them warmth and good light. After about a dozen more questions, I finally found the answer. She was using a soiless potting mix, that was hydrophobic. It is basically afraid of water. She had planted the seeds and when she tried to water them, the water just sat on top. She then proceeded to just mist the plants every couple of days. The seeds never received any moisture to germinate. I got her straightened out and sent her on her way. I wondered how many other people have trouble with starting plants from seeds.
Here is the Readers Digest version.
Commercial seed-starting mixes, usually composed of vermiculite and peat, without any true soil, are recommended for starting seeds. They're sterile, lightweight and free from weed seeds, with a texture and porosity especially suited to the needs of germinating seeds and tiny seedlings.
You can use a flat, tray, pot, egg or cottage cheese carton or any other kind of container that has drainage. (Be sure to punch drainage holes in the cottage cheese cartons.) Make sure the containers are clean. Wood, plastic and clay pots can be brushed and cleansed with a solution of 10% bleach and 90% water, if they are moldy or slimy.
Set the cell flats or containers into a solid tray, fill them with potting mix, and water the mix before sowing seeds. The potting mix will settle down into the containers, sometimes dramatically so. Add more potting mix and water again, until the containers or cells are nearly full. Then sow the seeds according to the package directions.
Transplants grown indoors need adequate light. Under low light conditions, vegetable seedlings become leggy and weak and tend to topple over when they are a few inches tall. A total of 16 to 18 hours of light (natural and artificial) is required to produce stocky seedlings.
Containers can be placed near a south-facing window and receive supplemental light provided by fluorescent lights. Seedlings can be grown under fluorescent lights alone. Forty watt, 48-inch long fluorescent tubes, with a timer, placed 2 to 4 inches above the seedlings is an adequate set-up. Consider attaching aluminum foil from the light fixture to reflect light onto the plants.
Seedlings growing in soiless mixes need to be fertilized when the first true leaves appear. Feed at every other watering with a water-soluble starter fertilizer to promote faster plant growth and until the plants are ready to plant outdoors. Wash the seedlings with plain water to remove any fertilizer from the leaves. Water between feedings with plain water to prevent any salt from accumulating in the media. Seedlings growing in mixes containing compost, rotted manure or commercially prepared soil may not need to be fertilized.
Water the transplants when they are slightly wilting. Stop watering when water runs out of the bottom of the container. For soilless media, determine the need for watering by squeezing the top half-inch of media between the thumb and forefinger. If water squeezes out easily, there is adequate moisture; if the medium feels slightly moist but water is difficult to squeeze out, water should be added.
Before the transplants are moved into the garden, they need to be hardened off. To condition plants to growing outdoors, set the seedlings outdoors during the day and bring them inside before sundown. The plants should be gradually exposed to more direct sun to avoid injuring the plants. Outside, the seedlings are exposed to varying temperatures, more direct sunlight, drying winds and greater moisture stress. The transplants will produce a cuticle on leaf and stem surfaces to reduce water loss. Continue this routine for two to three weeks to condition the seedlings. This adjustment may result in a temporary slow-down of growth, but it helps the plant successfully adapt to outdoor conditions. The adjustment must be gradual or the plant will be damaged, resulting in delayed growth, retarded fruiting and reduced yields when the plants are set out. Before being planted in the garden, transplants can also be moved to a hotbed, coldframe or other outdoor location where there will be plenty of sunshine, adequate ventilation and suitable temperature.
I hope this answers any questions or solves any problems you may have. Buying seeds is so much cheaper and there is a MUCH larger selection of varieties out there. Check online or your favorite garden catalog and try something new this year! The box stores can carry just so many plants and most of the time it is just the basics.
Happy Growing!
Darren
I had one woman come up to me and ask about starting seeds. She had planted some 5 weeks ago and nothing came up. Also repeated the process two weeks ago with the same result. I was puzzled. Surely SOMETHING had to come up, even with very old seeds. She assured me they were fresh, she had just bought them. She was giving them warmth and good light. After about a dozen more questions, I finally found the answer. She was using a soiless potting mix, that was hydrophobic. It is basically afraid of water. She had planted the seeds and when she tried to water them, the water just sat on top. She then proceeded to just mist the plants every couple of days. The seeds never received any moisture to germinate. I got her straightened out and sent her on her way. I wondered how many other people have trouble with starting plants from seeds.
Here is the Readers Digest version.
Commercial seed-starting mixes, usually composed of vermiculite and peat, without any true soil, are recommended for starting seeds. They're sterile, lightweight and free from weed seeds, with a texture and porosity especially suited to the needs of germinating seeds and tiny seedlings.
You can use a flat, tray, pot, egg or cottage cheese carton or any other kind of container that has drainage. (Be sure to punch drainage holes in the cottage cheese cartons.) Make sure the containers are clean. Wood, plastic and clay pots can be brushed and cleansed with a solution of 10% bleach and 90% water, if they are moldy or slimy.
Set the cell flats or containers into a solid tray, fill them with potting mix, and water the mix before sowing seeds. The potting mix will settle down into the containers, sometimes dramatically so. Add more potting mix and water again, until the containers or cells are nearly full. Then sow the seeds according to the package directions.
Transplants grown indoors need adequate light. Under low light conditions, vegetable seedlings become leggy and weak and tend to topple over when they are a few inches tall. A total of 16 to 18 hours of light (natural and artificial) is required to produce stocky seedlings.
Containers can be placed near a south-facing window and receive supplemental light provided by fluorescent lights. Seedlings can be grown under fluorescent lights alone. Forty watt, 48-inch long fluorescent tubes, with a timer, placed 2 to 4 inches above the seedlings is an adequate set-up. Consider attaching aluminum foil from the light fixture to reflect light onto the plants.
Seedlings growing in soiless mixes need to be fertilized when the first true leaves appear. Feed at every other watering with a water-soluble starter fertilizer to promote faster plant growth and until the plants are ready to plant outdoors. Wash the seedlings with plain water to remove any fertilizer from the leaves. Water between feedings with plain water to prevent any salt from accumulating in the media. Seedlings growing in mixes containing compost, rotted manure or commercially prepared soil may not need to be fertilized.
Water the transplants when they are slightly wilting. Stop watering when water runs out of the bottom of the container. For soilless media, determine the need for watering by squeezing the top half-inch of media between the thumb and forefinger. If water squeezes out easily, there is adequate moisture; if the medium feels slightly moist but water is difficult to squeeze out, water should be added.
Before the transplants are moved into the garden, they need to be hardened off. To condition plants to growing outdoors, set the seedlings outdoors during the day and bring them inside before sundown. The plants should be gradually exposed to more direct sun to avoid injuring the plants. Outside, the seedlings are exposed to varying temperatures, more direct sunlight, drying winds and greater moisture stress. The transplants will produce a cuticle on leaf and stem surfaces to reduce water loss. Continue this routine for two to three weeks to condition the seedlings. This adjustment may result in a temporary slow-down of growth, but it helps the plant successfully adapt to outdoor conditions. The adjustment must be gradual or the plant will be damaged, resulting in delayed growth, retarded fruiting and reduced yields when the plants are set out. Before being planted in the garden, transplants can also be moved to a hotbed, coldframe or other outdoor location where there will be plenty of sunshine, adequate ventilation and suitable temperature.
I hope this answers any questions or solves any problems you may have. Buying seeds is so much cheaper and there is a MUCH larger selection of varieties out there. Check online or your favorite garden catalog and try something new this year! The box stores can carry just so many plants and most of the time it is just the basics.
Happy Growing!
Darren
Friday, March 12, 2010
The Eve of THE EXPERIENCE

Well, it's the eve of the Carolina Yard Experience. If you don't know what it is, or are deciding whether to go or not, read on for all the insights.
Come join Clemson Extension Tri-county Master Gardeners, Clemson's Carolina Clear Program, the Ashley Cooper Stormwater Education Consortium, Charleston, Berkeley & Dorchester County Recycling, DHEC, and the Charleston Exchange Park for the first ever Tri-County Carolina Yard Experience!
Based on the Carolina Yards & Neighborhoods program, this event will inspire participants to create attractive and healthy yards by working with the
environment, rather than against it. This is a free, environmental event focused on the home landscape-including environmentally friendly gardening
practices, recycling, rainwater harvesting, pond management and much more! Hands-on demonstrations and educational displays by county extension agents and Master Gardeners.
If that is not enough to get you to come, here are some of the things that are actually happening.
What to bring:
An electronic for recycling. Items such as Home and office equipment: CPUs, monitors (color and b/w), laptops, hard drives, keyboards, mice, printers, copiers, scanners, fax machines, adding machines, calculators, telephones, cell and cordless phones, PDAs, pagers and shredders.
Audio visual equipment: TVs, VCRs, stereos, radios, camcorders, CD players, DVD players and cassette players.
Hazardous Household Materials for recycling. These include: Household Cleaners and Polishes, Pesticides and Repellents, Paints and Solvents.
A bucket and shovel for your free compost. There will be a mound of compost available for the public to load up on as much compost as they want!
Lawnmower blade for sharpening. Someone will be on hand to sharpen lawnmower blades so that your lawnmower can run better and longer.
Sample of your soil to get free advice on the health of your soil.
Lastly…. The Lawn Mower Exchange
Trade in your gas powered lawnmower for an electric lawnmower at a discounted price at the Second Annual Lawn Mower Exchange held in the parking lot from 9 a.m. to 2 p.m.
Demonstrations, Lectures and Seminars:
10:00 AM -- Carolina Yards and Neighborhoods Overview-Water Smart Landscaping
11:00 AM -- Pond Management 101
11:00 AM -- The Good, Bad and Ugly...In the Garden: Integrated Pest Management
12:00 PM -- Environmentally Friendly Turf Management
1:00 PM -- The Good, Bad, and Ugly...In the Garden: Integrated Pest Management
11:30 AM -- Saving a Rainy Day: Rainwater Harvesting 101
12:30 PM -- Rain Garden Installation
1:00 PM -- Beautiful Borders: Installing Vegetative Buffers
All Day Long Demonstrations:
Garden Zone:
Secrets to Great Container Gardening
Plant Crimes: Victim or Perpetrator--Tree and Shrub Management
Lasagna Gardening
Proper Fertilizer and Pesticide Application and Safety
Water Zone:
Pervious Hardscaping
Green Roofs
On the Water: Boat Maintenance
Rainwater Cistern Technology
Plant Zone:
Ask a Master Gardener
Wheel of Horticulture
SC Native and Well-Adaptive Plant Sale
Carolina Yard Zone:
Vegetable Gardening
Self-Guided Tours
Compost Zone:
Composting Methods and Demonstrations
Composter Display
Wildlife Zone:
Bird and Butterfly Garden Installation
Kid Zone:
Build-Your-Own Pine Cone Bird feeder
Parsley Planting
Storm Drain Marking
Displays in the Ag Building:
Charleston Water Systems
Community Pride
SC Amphibian, Arachnid and Reptile Society
Charleston County Mosquito Control
Fields to Families
Berkeley County Water and Sanitation
Clemson DPI/Invasive Plants
Dorchester County Recycling
Charleston County Recycling
Berkeley County Recycling
What will be for sale:
Master Gardener Books
Master Gardener plants
Mepkin Abbey Native Plants
Come ready to eat!
The Hanahan Band Boosters will be selling food so come check it out!
As you can see, this is going to be an event filled day. The weather, I hope, is going to co-operate....I think it will. This event has been in the planning stages since February 2009. Please come on out! I look forward to seeing everybody at THE EXPERIENCE!
Happy Growing!
Darren
Thursday, March 11, 2010
HomeGROWN Upside Down Cake
One of my favorite tropical fruits to grow, other than Citrus, are Pineapples. They are easy to grow, look really cool, and provide me with some of my favorite cake ingredients.
First, a little history and information about Ananas comosus, Pineapple.
The pineapple is the leading edible member of the family Bromeliaceae or Bromeliads.
Native to southern Brazil and Paraguay area where wild relatives occur, the pineapple was apparently domesticated by the Indians and carried by them up through South and Central America to Mexico and the West Indies long before the arrival of Europeans. Christopher Columbus and his shipmates saw the pineapple for the first time on the island of Guadeloupe in 1493 and then again in Panama in 1502. Caribbean Indians placed pineapples or pineapple crowns outside the entrances to their dwellings as symbols of friendship and hospitality. Spaniards introduced the pineapple into the Philippines and may have taken it to Hawaii and Guam early in the 16th Century.
I can find evidence of some 36 different varieties of Pineapple. There quite possibly could be more than that!
Growing them is easy. The pineapple is a tropical or near tropical plant. A temperature range of 65°-95°F is best, though the plant can tolerate cool nights for short periods. That is the official temperature range by the "experts". Keep in mind, I am a zone 8 and mine have actually gone down to 33 degrees in my greenhouse. They don't seem to be bothered very much. The pictures are the proof of that!


These are being grown in containers.
Rainfall should be about 45 inches per year, though the pineapple is drought tolerant and will produce fruit with as little as 25 inches , depending on cultivar, location and degree of atmospheric humidity.
The best soil for pineapple is a well-drained, sandy loam with a high content of organic matter. The pH should be within a range of 4.5 to 6.5.
Rooting one is fairly easy, though I will admit, this IS the trickiest part.
First, buy a pineapple at the grocery store. Get one that has some nice green leaves on top. If they have been trimmed, that is no problem. Cut off the top of the pineapple about 1/2 inch below the cluster of leaves. The pineapple top should then be allowed to dry for several days. Just a side note here, I accidentally left a pineapple top to dry for 6 weeks in a spare room of the house, and it still rooted. I don't recommend this, but just wanted to let you know there is no "set" time limit.
After drying, insert the pineapple top into perlite, vermiculite, coarse sand or any combination of these that you prefer, up to the base of its leaves. Keep the rooting medium moist, but not wet, during the rooting period. Rooting should occur in 6 to 8 weeks, depending on conditions. A little bottom heat will speed things up also. Keep it in bright indirect light for this time. After it has produced some roots, move it out to more dabbled sun for about 2 weeks. After this period of time, move it to full sunlight.
After you get them going, you will want to feed them. Nitrogen is essential to the increase of fruit size and total yield. I use just a balanced fertilizer of 10-10-10. You can use pretty much anything with a high first number.
It will take two to three years to get fruit, depending on how well you take care of it.
Once you get fruit, the way I can tell it is ripe, is by smell. There will be a very heavy scent of pineapple.
I have not had any real pests attack my pineapples. Mealybugs can be a problem, but again, I have not had any.....at least not on the pineapples, I think they prefer the Citrus!
I did come across a few little interesting tidbits while I was researching for this post. When unripe, the pineapple is not only inedible but poisonous, irritating the throat and acting as a drastic purgative. I have tried to eat an unripe Pineapple once. It broke off too early in a storm and I wanted to see if it would be edible. It wasn't even close! I had a piece about the size of a peanut and couldn't even keep it in my mouth, it was very bitter. So, I know I won't have to worry about being poisoned by unripe pineapple, it's too gross to eat.
If the flowers are pollinated, small, hard seeds may be present, but generally one finds only traces of undeveloped seeds. Since hummingbirds are the principal pollinators, these birds are prohibited in Hawaii to avoid the development of undesired seeds.
And finally, Pineapple juice has been employed for cleaning machete and knife blades and, with sand, for scrubbing boat decks. I can only imagine how sticky that deck was. At least no one would fall overboard!
Happy Growing!
Darren
First, a little history and information about Ananas comosus, Pineapple.
The pineapple is the leading edible member of the family Bromeliaceae or Bromeliads.
Native to southern Brazil and Paraguay area where wild relatives occur, the pineapple was apparently domesticated by the Indians and carried by them up through South and Central America to Mexico and the West Indies long before the arrival of Europeans. Christopher Columbus and his shipmates saw the pineapple for the first time on the island of Guadeloupe in 1493 and then again in Panama in 1502. Caribbean Indians placed pineapples or pineapple crowns outside the entrances to their dwellings as symbols of friendship and hospitality. Spaniards introduced the pineapple into the Philippines and may have taken it to Hawaii and Guam early in the 16th Century.
I can find evidence of some 36 different varieties of Pineapple. There quite possibly could be more than that!
Growing them is easy. The pineapple is a tropical or near tropical plant. A temperature range of 65°-95°F is best, though the plant can tolerate cool nights for short periods. That is the official temperature range by the "experts". Keep in mind, I am a zone 8 and mine have actually gone down to 33 degrees in my greenhouse. They don't seem to be bothered very much. The pictures are the proof of that!


These are being grown in containers.
Rainfall should be about 45 inches per year, though the pineapple is drought tolerant and will produce fruit with as little as 25 inches , depending on cultivar, location and degree of atmospheric humidity.
The best soil for pineapple is a well-drained, sandy loam with a high content of organic matter. The pH should be within a range of 4.5 to 6.5.
Rooting one is fairly easy, though I will admit, this IS the trickiest part.
First, buy a pineapple at the grocery store. Get one that has some nice green leaves on top. If they have been trimmed, that is no problem. Cut off the top of the pineapple about 1/2 inch below the cluster of leaves. The pineapple top should then be allowed to dry for several days. Just a side note here, I accidentally left a pineapple top to dry for 6 weeks in a spare room of the house, and it still rooted. I don't recommend this, but just wanted to let you know there is no "set" time limit.
After drying, insert the pineapple top into perlite, vermiculite, coarse sand or any combination of these that you prefer, up to the base of its leaves. Keep the rooting medium moist, but not wet, during the rooting period. Rooting should occur in 6 to 8 weeks, depending on conditions. A little bottom heat will speed things up also. Keep it in bright indirect light for this time. After it has produced some roots, move it out to more dabbled sun for about 2 weeks. After this period of time, move it to full sunlight.
After you get them going, you will want to feed them. Nitrogen is essential to the increase of fruit size and total yield. I use just a balanced fertilizer of 10-10-10. You can use pretty much anything with a high first number.
It will take two to three years to get fruit, depending on how well you take care of it.
Once you get fruit, the way I can tell it is ripe, is by smell. There will be a very heavy scent of pineapple.
I have not had any real pests attack my pineapples. Mealybugs can be a problem, but again, I have not had any.....at least not on the pineapples, I think they prefer the Citrus!
I did come across a few little interesting tidbits while I was researching for this post. When unripe, the pineapple is not only inedible but poisonous, irritating the throat and acting as a drastic purgative. I have tried to eat an unripe Pineapple once. It broke off too early in a storm and I wanted to see if it would be edible. It wasn't even close! I had a piece about the size of a peanut and couldn't even keep it in my mouth, it was very bitter. So, I know I won't have to worry about being poisoned by unripe pineapple, it's too gross to eat.
If the flowers are pollinated, small, hard seeds may be present, but generally one finds only traces of undeveloped seeds. Since hummingbirds are the principal pollinators, these birds are prohibited in Hawaii to avoid the development of undesired seeds.
And finally, Pineapple juice has been employed for cleaning machete and knife blades and, with sand, for scrubbing boat decks. I can only imagine how sticky that deck was. At least no one would fall overboard!
Happy Growing!
Darren
Wednesday, March 10, 2010
Ketchup to a Growing Trend
I was reading an article today that really got me thinking. It was from the electronic version of Growing Produce Magazine. It was discussing the loss that Florida Growers suffered this past January. Here is the article:
The record-breaking cold spell that affected Florida for almost two weeks straight in January hit many growers hard, especially tomato growers. Almost 70% of the early spring crop was destroyed.
Fresh tomato prices have been impacted greatly. Reggie Brown, executive vice president of Florida Tomato Growers Exchange, is reporting that a 25-pound box of tomatoes is trading for $30, compared with $6.45 a year ago. The prices are expected to take a tumble in April as South Florida’s crop, which appears in tact, comes on line.
The current shortage in fresh tomatoes have restaurants scrambling to adjust their menus and/or ration what they have. It also has forced supermarkets to consider more imports.
The very last sentence is what really got me to thinking. "It also has forced supermarkets to consider more imports". There are a lot of problems with this. The sanitation of many foreign countries is WAY below ours. Pesticides used by some countries are forbidden in this country, yet we eat the produce that it is used on from them.
I have been screaming for years, trying to get people to grow more of their own fruits and veggies. It is one of the many reasons I became a Master Gardener.
It truly is not that hard. I hear excuses like,
"I don't have enough room". Well, Tomatoes, Peppers, Okra, Carrots, Herbs, and a whole bunch of other things can be grown on a small scale in containers. I am not saying you will be able to live on what you grow, but you sure can grow enough for a few sides of meals.
"I don't have a green thumb, nothing grows for me". There are more books, websites and helpful information available than ever before. Certainly more than our Grandparents ever had! They just kind of knew and passed it down to the next generation. Sadly, gardening is a dying art! How long does it take to Google "How to Grow XYZ?" Yet, many of these same people can tell you were to find the words to a new song or a secret code to do something in a video game online.
"I don't know what to plant". This one is easy....what do you like to eat? Beans are a very easy crop to grow. They are very easy to find seeds for. They are very nutritious and are usually very heavy producers. If you don't like beans, there are hundreds of other things.
"I don't have time". Most of the time a little water, the occasional feeding and watching for weeds and bugs is all it takes. For a small garden or a couple of containers, I would bet the average time needed would be about 15 minutes a day. Or at least every other day. While you are drinking your morning coffee, wander the garden or observe the pots. It is therapeutic as well as helpful.
I won't even get into the healthy aspect what of a little exercise will do for you.
There is a huge trend to grow your own veggies right now. Why not jump on the train? The amount of information out there is steady and strong, take advantage of it. Buddy up with your friendly, local Master Gardener. Ask questions, join garden clubs, go to plant swaps...read and pass along my blog. (ha ha) I bet you can/will learn a lot!! Gardeners are some of the most generous people I have EVER met!
Happy Growing!
Darren
The record-breaking cold spell that affected Florida for almost two weeks straight in January hit many growers hard, especially tomato growers. Almost 70% of the early spring crop was destroyed.
Fresh tomato prices have been impacted greatly. Reggie Brown, executive vice president of Florida Tomato Growers Exchange, is reporting that a 25-pound box of tomatoes is trading for $30, compared with $6.45 a year ago. The prices are expected to take a tumble in April as South Florida’s crop, which appears in tact, comes on line.
The current shortage in fresh tomatoes have restaurants scrambling to adjust their menus and/or ration what they have. It also has forced supermarkets to consider more imports.
The very last sentence is what really got me to thinking. "It also has forced supermarkets to consider more imports". There are a lot of problems with this. The sanitation of many foreign countries is WAY below ours. Pesticides used by some countries are forbidden in this country, yet we eat the produce that it is used on from them.
I have been screaming for years, trying to get people to grow more of their own fruits and veggies. It is one of the many reasons I became a Master Gardener.
It truly is not that hard. I hear excuses like,
"I don't have enough room". Well, Tomatoes, Peppers, Okra, Carrots, Herbs, and a whole bunch of other things can be grown on a small scale in containers. I am not saying you will be able to live on what you grow, but you sure can grow enough for a few sides of meals.
"I don't have a green thumb, nothing grows for me". There are more books, websites and helpful information available than ever before. Certainly more than our Grandparents ever had! They just kind of knew and passed it down to the next generation. Sadly, gardening is a dying art! How long does it take to Google "How to Grow XYZ?" Yet, many of these same people can tell you were to find the words to a new song or a secret code to do something in a video game online.
"I don't know what to plant". This one is easy....what do you like to eat? Beans are a very easy crop to grow. They are very easy to find seeds for. They are very nutritious and are usually very heavy producers. If you don't like beans, there are hundreds of other things.
"I don't have time". Most of the time a little water, the occasional feeding and watching for weeds and bugs is all it takes. For a small garden or a couple of containers, I would bet the average time needed would be about 15 minutes a day. Or at least every other day. While you are drinking your morning coffee, wander the garden or observe the pots. It is therapeutic as well as helpful.
I won't even get into the healthy aspect what of a little exercise will do for you.
There is a huge trend to grow your own veggies right now. Why not jump on the train? The amount of information out there is steady and strong, take advantage of it. Buddy up with your friendly, local Master Gardener. Ask questions, join garden clubs, go to plant swaps...read and pass along my blog. (ha ha) I bet you can/will learn a lot!! Gardeners are some of the most generous people I have EVER met!
Happy Growing!
Darren
Subscribe to:
Posts (Atom)